

A few years ago in university, a friend of mine said something to the effect of, “if you don’t know code in a few years, you’ll basically be illiterate”.
Okay, so he wasn’t exactly right and we made fun of him for it for a while, but looking back, he wasn’t far off. Code is the language of the future – one just needs to look at the number of programming and development job openings as proof. In today’s world, a Python isn’t a snake, Java doesn’t mean your morning coffee, and it turns out C++ isn’t the unnecessarily precise grade I received on my last final exam.
Though I know the slightest amount of HTML and CSS, I know how hard it can be to keep up as a marketer. I get lost doing anything beyond formatting a blog post (and I needed a ton of help for this one). Luckily, people have noticed, and the increasing number of marketing software solutions makes it easier and easier for us marketers to do some pretty phenomenal things, all without knowing how to code.
So I put this together for people like you and me: 5 outstanding marketing campaigns you can run without a developer.
Note: I’m using Wishpond for all of the tips featured in this article (for obvious reasons!), but any good marketing software platform should allow you to do at least a few of these things. If you’d like to follow along directly, don’t hesitate to hop onto a 14-day free trial of Wishpond.
Let’s go!
Create Landing Pages
Purpose:
Collect leads and inform customers

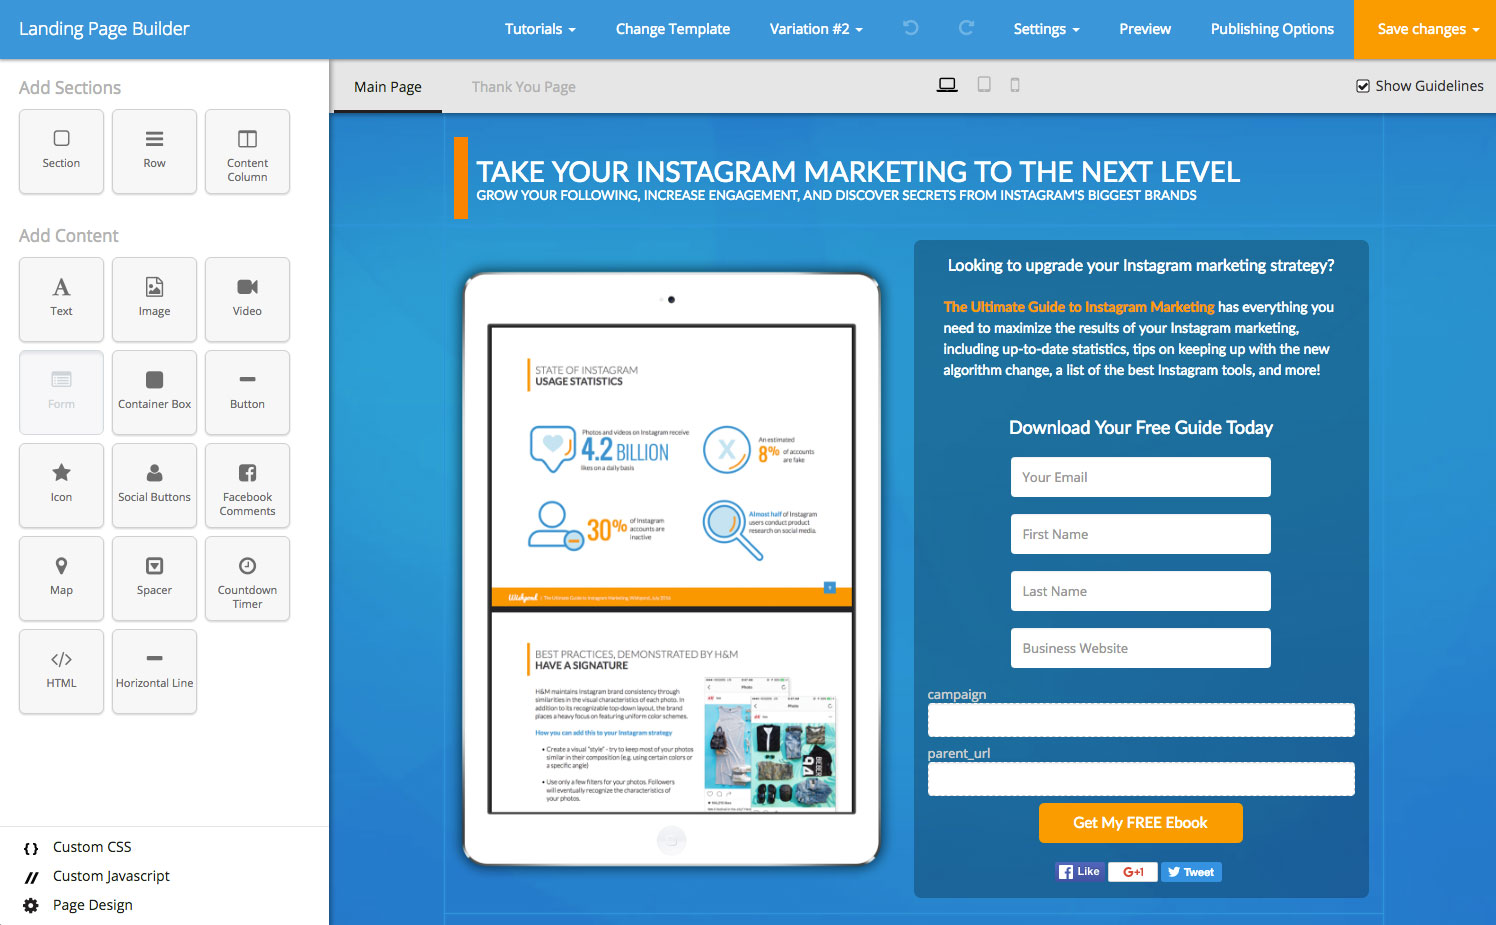
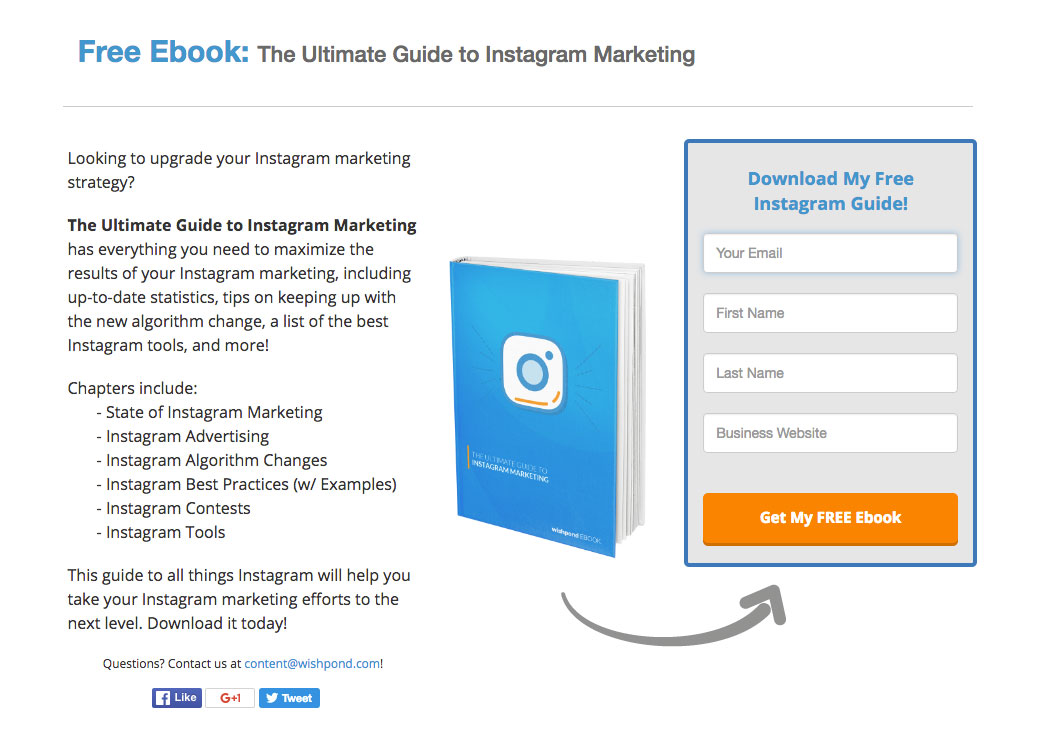
Pretty much every brand can use a landing page for… something, whether that’s collecting tips to market a future product to, or phone numbers you can pass to your sales team. Here’s an example of a landing page I created for one of our new ebooks, The Ultimate Guide to Instagram Marketing.

Looks pretty neat, right? Guess how much coding I had to do.
None.
With Wishpond’s intuitive drag-and-drop landing page builder, it’s easy for even most code-illiterate of marketers (read: me) to put together a gorgeous landing page. Because a landing page can often be the first thing potential leads see from your brand, it’s important that it makes a good first impression.
This means it needs to do two things:
- Look good: Wishpond offers a tremendous variety of beautiful templates, which means you’ll never have trouble finding a style that meets your needs.
- Work well: All of your forms and buttons need to work as intended – you don’t want to miss potential conversions just because your “submit” button is broken.
In Wishpond’s landing page builder, you have the ability to edit your landing page for a variety of screen sizes. This means it looks great whether it’s being viewed on a phone, tablet, or computer, all without coding (often called responsive or adaptive design).
Similar to many drag-and-drop website creators like Squarespace, modern landing page builders have pulled creative vision and finished product closer together than ever before. To the absolute delight of me and millions of marketers, around the world, knowing how to code is no longer a necessity when it comes to developing a dazzling, fully-featured landing page.
Power User Tip #1: A/B Test Landing Pages
Most of the time, you’ll have a couple different ideas for your landing pages. Sometimes it’s something small, like the number of fields on a form or the location of an image. Other times, it’s a total redesign of the landing page.
Whatever it is, we know as marketers that it’s important to make data-driven decisions. When it comes to landing pages, A/B testing is the way to go. Whatever landing page builder you end up choosing, make sure it has an A/B testing function.
Put simply, an A/B testing feature allows you to create two or more variations of a single landing page. When people visit the landing page URL, they’ll randomly see one of your landing page variations.
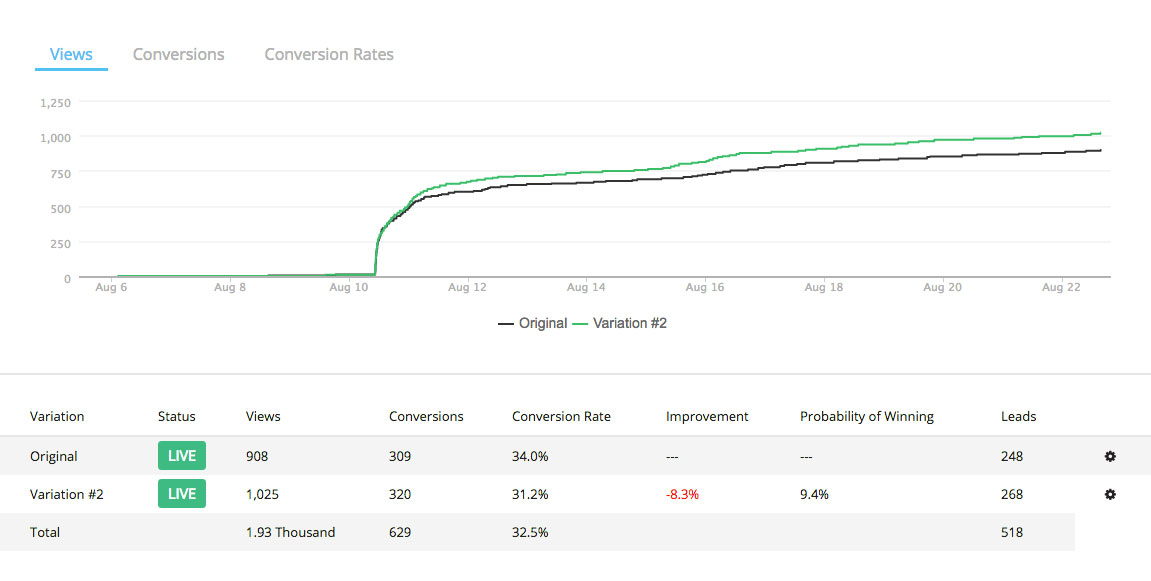
Since each variation tracks its statistics separately, you’ll be able to see individual conversion rates and compare your variations, meaning you’ll be able to identify the best iteration of your landing page. Understanding the variables that affect viewer behaviour is a key step on your way to optimizing your conversion rates.
Create Forms to Gather Lead Data
Purpose:
Collect information on potential customers for future marketing efforts

Whenever you create a landing page, you generally do so with some sort of goal in mind – maybe you just want the names of your leads, or perhaps you’re trying to get a better idea of your customers’ habits and preferences.
Whatever your goal is, you need to collect and store that data for future use. With your landing page editor of choice, it’s simple – and guess what? No coding necessary.
To do this, you just need to create a form. Here’s what our Ultimate Guide to Instagram Marketing form looks like in the Wishpond landing page editor:

For this eBook, our goal was to collect business information from our leads, which is why we chose to collect their business website. As you can see, all I had to do was drag and drop the fields I needed into the form.

Through some Wishpond hocus-pocus, the data corresponding to each lead is sent into a Leads Database, where individual leads can be viewed and managed. On top of this, you can track each lead’s activities, like seeing which pages they’ve viewed or converted on.
Being able to collect such specific data allows any marketer to more strategically tailor their marketing efforts to the habits and behaviours of their leads.
Power User Tip #2: Fun with Fields
Beyond standard form fields, Wishpond offers extensive field features that can help your marketing strategy. Let’s go over a few of them here.
Fields Tip #1: Auto-focus the first form field
Sometimes, it’s the little things.
While editing online forms within Wishpond, you can check the box “Auto-focus on the first form field” under the Settings tab to place the text cursor in your first form field immediately upon page load. This is something that normally takes a little bit of code, but it’s a feature that’s built into the Wishpond platform.
Having your landing page auto-focus on the first field within a form nudges visitors towards your form and makes it that little bit easier for them to fill out their information, which can be the difference between a bounce and a conversion.
Fields Tip #2: Hidden form fields
At Wishpond, we use hidden form fields all the time. Nick, our Chief Product Officer, recently gave us a presentation in the office explaining a ton of cool things we can do with the platform, just in time for this article.
One of the highlights of the presentation covered some applications of hidden form fields. In case it isn’t obvious, hidden form fields are fields on a form that don’t show up to the viewer – they’re basically only visible on the backend. They’re handy for when you want to do things like add a specific lead property to everyone who converted on a particular campaign, or to use a lead property to trigger a workflow.
Nick featured one specific use for these form fields in his presentation with us which a lot of us found really cool.
Basically, you can use hidden fields to assign salespeople (or customer service representatives, etc.) to certain leads so all emails (even automated ones sent to all leads) look like they’re coming directly from that salesperson. That way, if a lead replies, it goes directly to the salesperson and helps to build a strong rapport.
Here’s how you do it.
For this example, let’s say I want to assign my imaginary buddy Harley to all the leads coming from the landing page for my new yoga studio. I’d create my form as usual, but I’d add another single line text field with the new lead property “Salesperson” like this:
In the field’s settings, I’d check the boxes “Make this field hidden” and “Add a default field entry”, adding “Harley” to the text box for the latter:
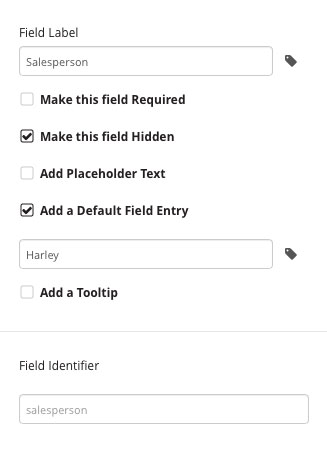
Adding a default field entry means anybody who converts on this form will automatically have Harley added as a Salesperson to their lead properties. I’d also add Harley’s email in a second hidden text field called “Salesperson email”.
Here’s what our form looks like from the landing page editor, compared to how it looks on the live landing page:
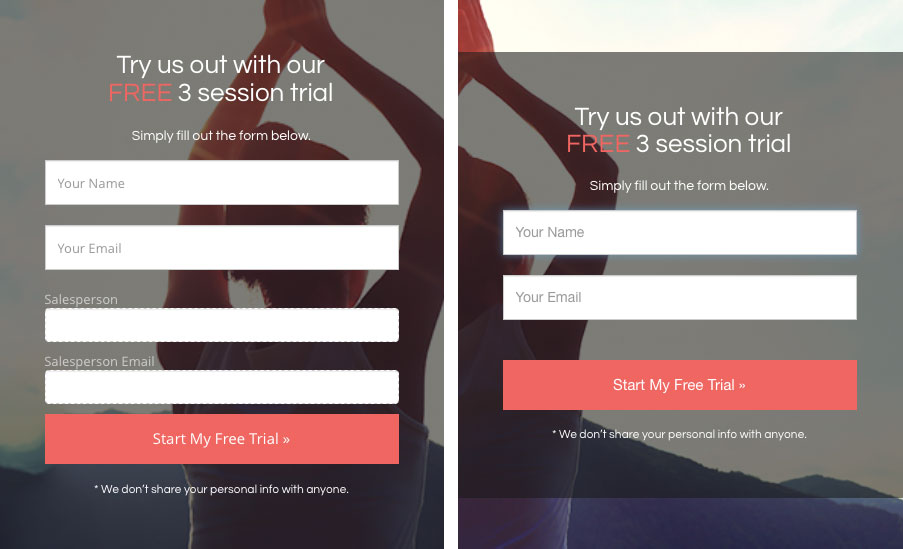
That’s it! Now, when you’re sending out emails (automated or not) you can use the merge tags {{salesperson}} and {{salesperson_email}} to send leads emails from their assigned salesperson’s email, with their salesperson’s name.
Create Multiple Types of Popups
Purpose:
Prompt visitors to convert

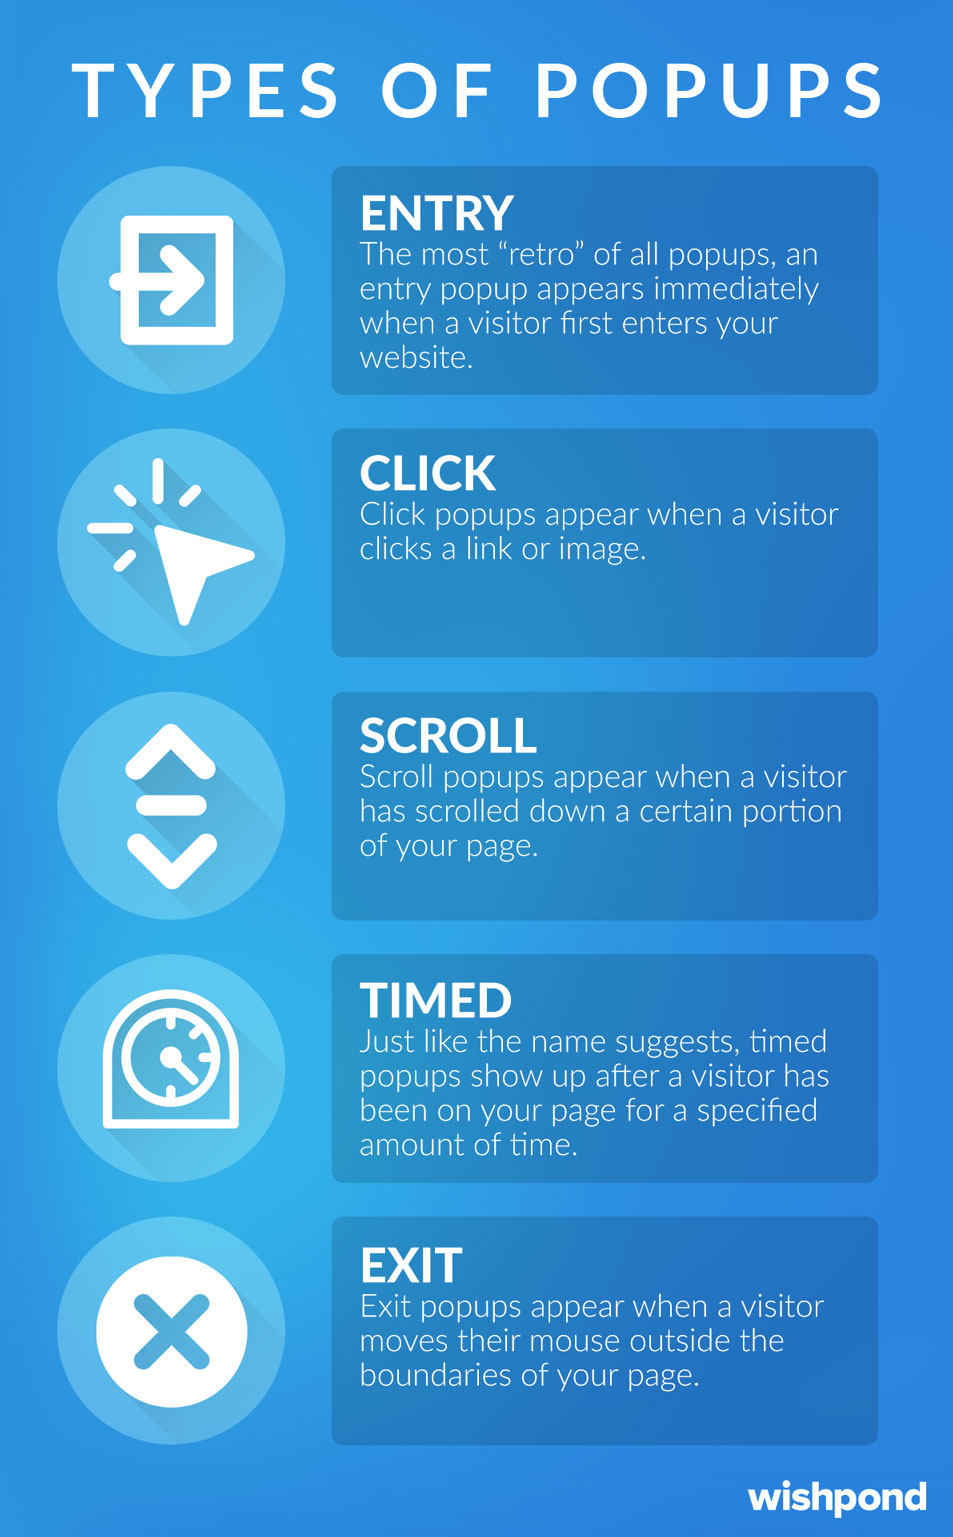
Popups – you’d be hard-pressed to find anybody who loves them, but fact of the matter is they work. They draw the attention of website visitors, and can often turn a lost lead into a conversion. So, as a marketer in the digital age, it definitely doesn’t hurt to know how to put together different types of popups. There’s quite a few: click, scroll, exit, timed, entry… the list goes on.
Lucky for you and me, modern marketing suites make it easy to put great-looking popups together. Here’s what Wishpond’s popup builder looks like:
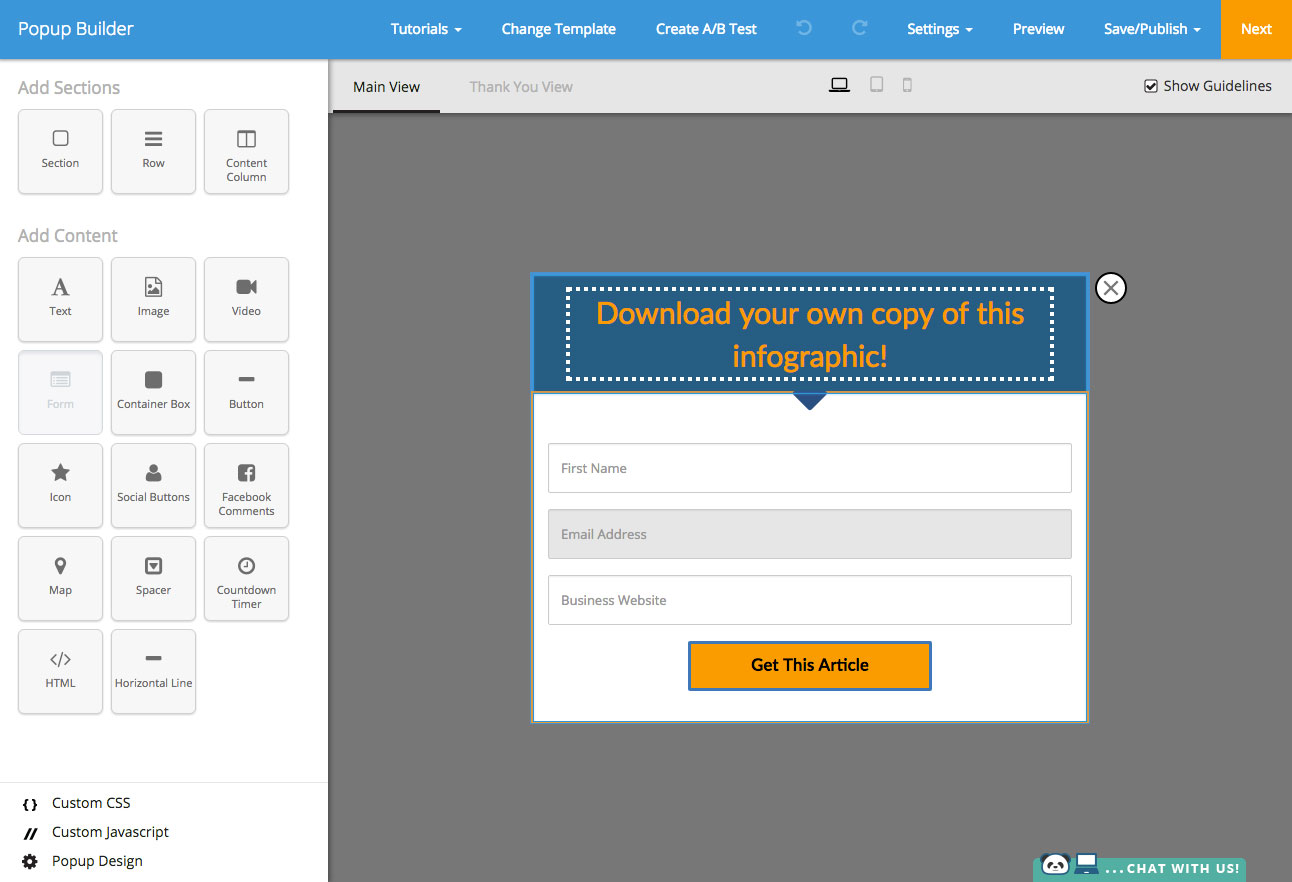
Just like the landing page editor, it’s simple to build popups just by dragging and dropping elements onto the editor. Again, there’s a multitude of templates available, so you can create popups in just a couple minutes.
When you’re ready to publish, you’ll select the type of popup you want. Here’s a quick infographic to highlight the five main types:
Just like landing pages, you can A/B test different popup variations and track the performance of each of your popups from the Wishpond dashboard.
Remember when I said there was no coding involved? Okay, I lied a little – you’ll probably notice that certain types of popups actually require you to insert code into a blog post or webpage. Luckily, all you need to do is copy and paste the code and change the link text – simple.
Here’s an example, featuring a click popup for our State of Lead Generation Industry Report. The popup is live and now I want to feature a click popup in our next blog article about lead generation. Here’s what I see once I’ve published the popup:
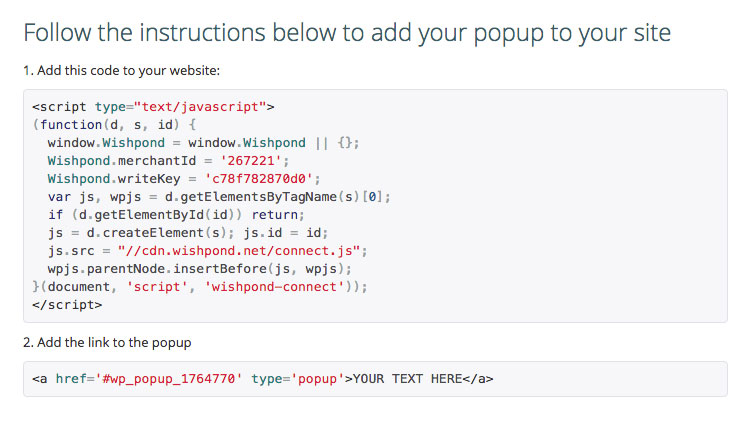
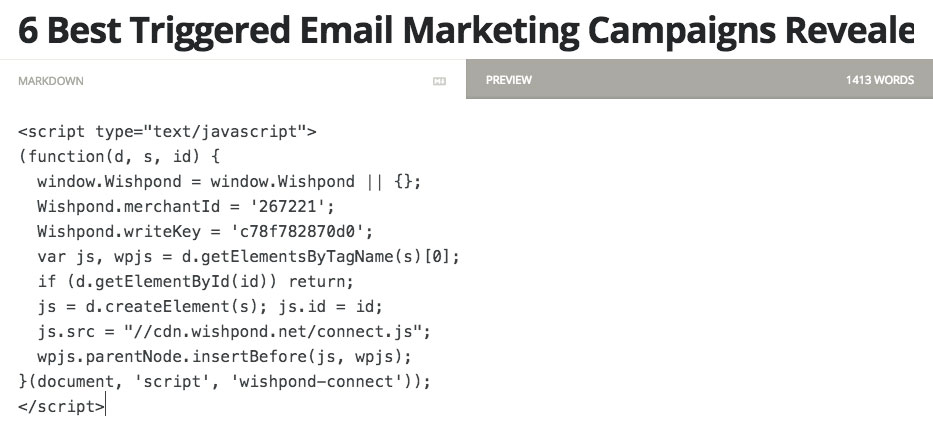
Like it says, I first need to copy the code from the first box into the blog post:
Now, I’ll copy the code from the second box and paste it into the location I’ve chosen within my blog post. I’ve also edited “YOUR TEXT HERE” to the include the copy I want to use for my click popup. In practice, you can jazz it up a little with CSS and HTML, but we’re going to stray away from that because we’re in a code-free zone. Here’s what it looks like (highlighted in green):
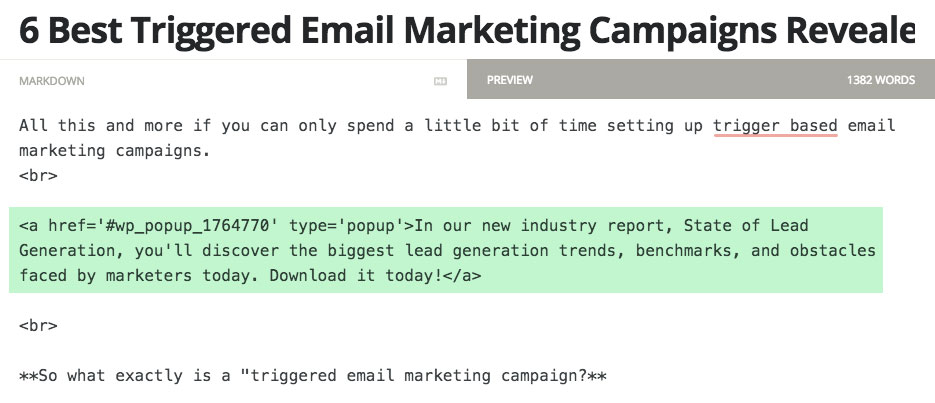
Here’s what my click popup text looks like:

And our (slightly fancier) live click popup:

Power User Tip #3: Target Repeat Visitors with Popups
Most of the time, you won’t get a visitor to your website to convert the first time. But what if there was a way to show specific popups to your repeat visitors? You’d be able to draw their attention and increase their chances of conversion, especially if you offer them an incentive of some sort.
Let me show you.
Let’s say I’m running an E-commerce shop selling a new water bottle. On their first visit, I find most customers check out the product’s features and then bail when they see the price. Though I could just lower the price, it’s not guaranteed to increase sales and might cause some trouble in the long run if I intend to raise it again.
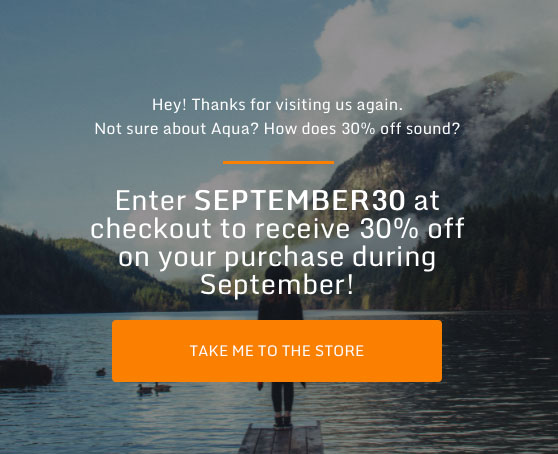
Instead, I’ll create a popup that triggers when someone visits my site for the second time. Not only does this focus a viewer’s attention exactly where I want it, it presents an opportunity to create a sense of urgency. Here’s an example of a popup I might use for a repeat visitor:
Here’s how to implement it.
Build your popup as you normally would, with some copy that alludes to that visitor having returned to your site. If you’re going to provide a coupon code right on the popup, I’d make it something unique to the popup so you can track its usage and the success rates of your repeat-visitor strategy. You can also ask for their email and automate sending them a coupon once they convert, but visitors may be reluctant to provide that information – plus, giving them the coupon immediately lowers their barriers for purchase.
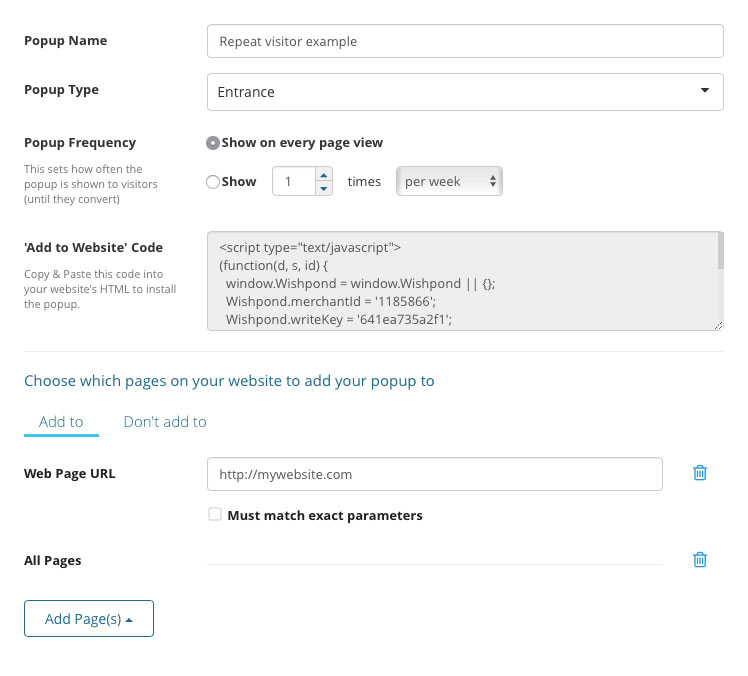
Once that’s done, you’ll move into your publishing options. I’d recommend an entrance popup for this repeat-visitor popup to ensure they see it, but a scroll or timed popup would also be good choices. You’ll want to add it to “All Pages” so it’ll trigger only on pages that have the popup code installed. Speaking of that code – copy that somewhere, since we’ll be using it in just a sec. Here’s what my publishing options look like:
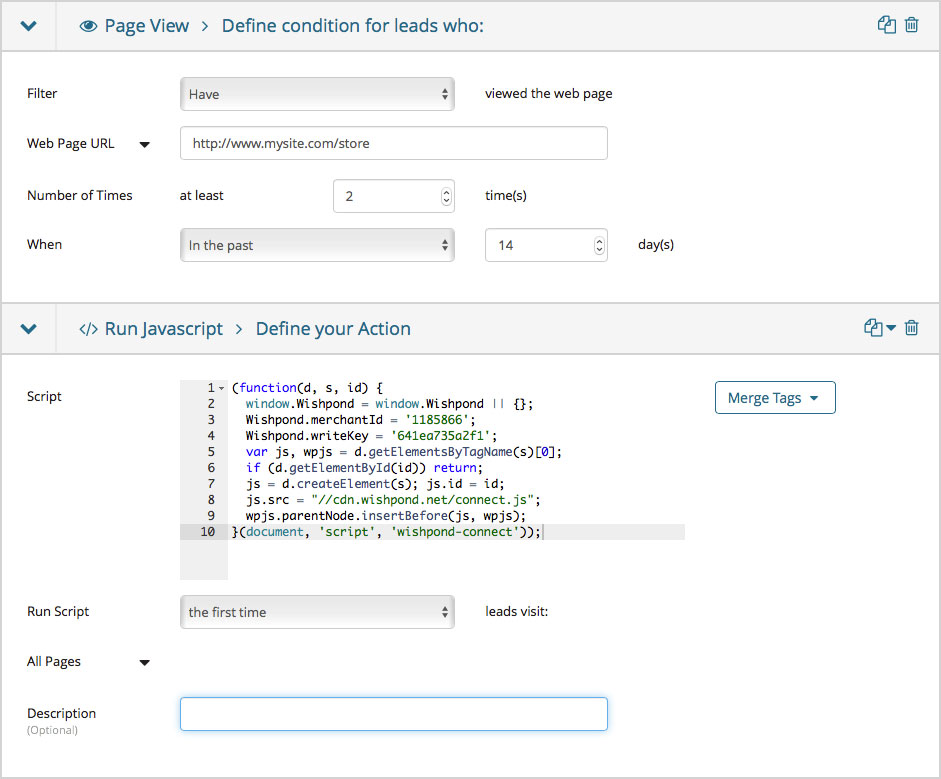
Once that’s live, we need to create a workflow that triggers when people have visited our page of choice multiple times. Here are my workflow settings:
You can see I’ve set a Page View condition targeting visitors who have viewed my store page at least twice in the past two weeks (keep all of the Condition Settings checkboxes default). I’ve also set a Run Javascript action and copied over that code from earlier. This is what triggers the popup to run only after a user has viewed your page previously.
And that’s it! You know have a way to directly target repeat visitors. Pretty neat.
Reach Out to Leads with Email Marketing Automation
Purpose:
Nurture leads into sales

Between landing pages and the different types of popups, you have several avenues through which you can collect leads for your business. So what now?
The best course of action is to nurture these leads using marketing automation.
What is marketing automation? you might be asking.
At its simplest, marketing automation is the use of software to automate actions based on activity from leads or customers. The emails you get when you sign up for a new service with a discount for an upgrade, or when you’re about to check out and balk at the cost of shipping, or when it’s time to pay for that Netflix subscription you only use to watch Friends? Marketing automation.
It’s safe to say that pretty much any email that isn’t personal, a newsletter, or someone claiming to be the wealthy king of a foreign nation is automated.
Here’s an example from an email our friends at Buffer sent me after my Buffer queue emptied:
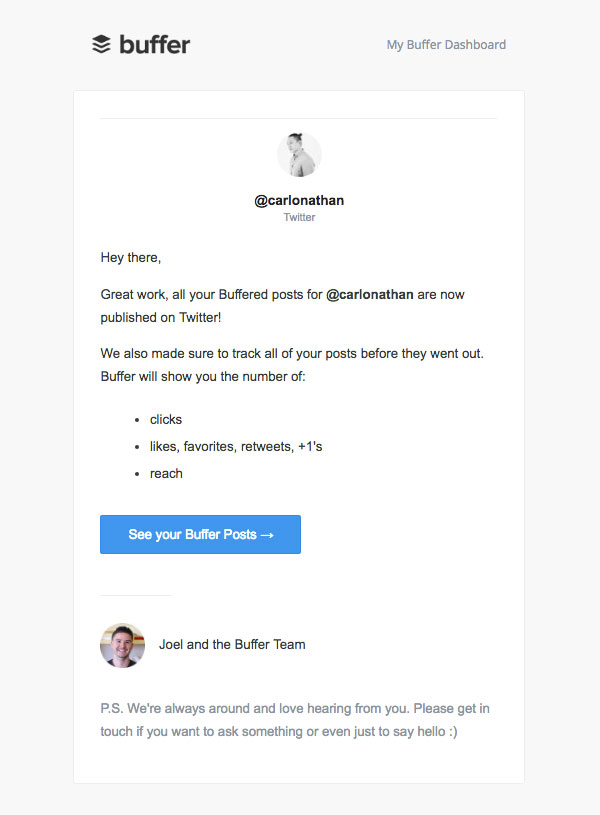
Basically, they created a workflow to run as soon as my Buffer queue emptied. That workflow was set up with a condition that was met when my queue became empty. The fulfillment of that condition triggered an action, which in this case was the sending of this email. Sounds simple enough, right?
Marketing automation is an easy way for brands and marketers to maintain constant contact with their leads using more personalized communications. Structuring these communications around lead data you’ve gathered makes it much easier to write an email that will lead to a signup or sale.
Here’s what conditions look like within the Wishpond marketing automation tool:
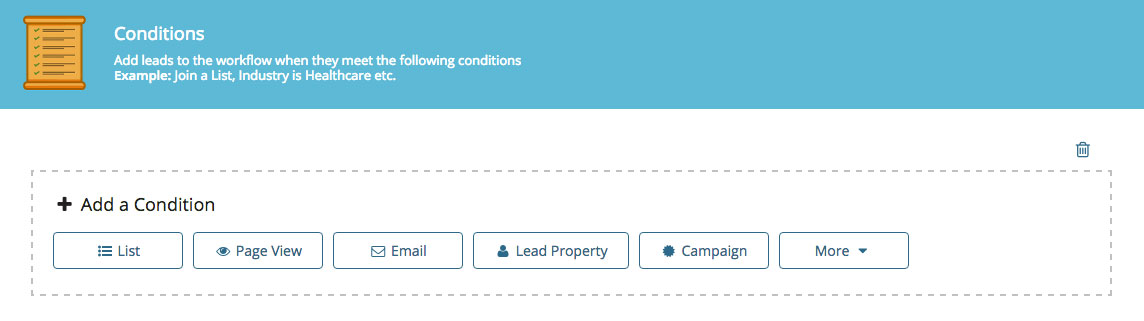
As you can see, users have several condition options for leads, including being having viewed a certain page, having a particular lead property, or converting on a certain campaign, among others. These conditions can be mixed and matched on the Wishpond platform to ensure you can manage your leads with laser precision.
Next are actions – these are the events that trigger when a lead has met the workflow’s preset conditions. Here’s what actions look like:
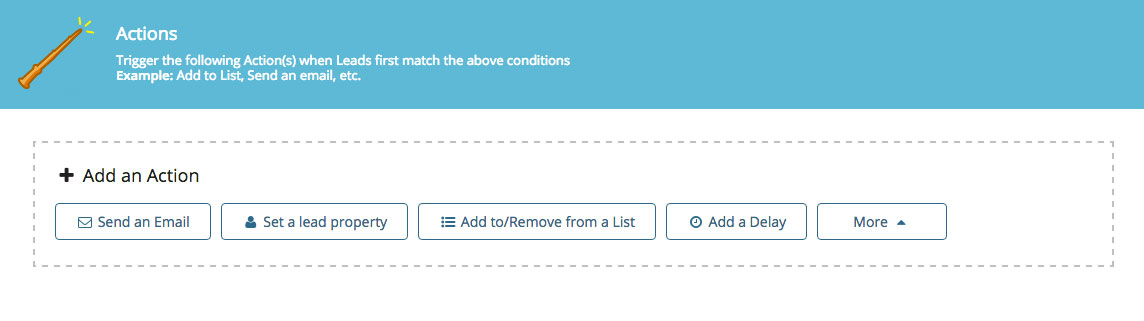
Like conditions, workflows can trigger multiple events. A common use for multiple events is to create email drip campaigns, in which you send several emails with delays in between them.
Though most workflows are pretty simple, you can also set up marketing automation to add certain properties to your leads, run Javascript, or send internal emails – for example, you might want to send an email to your sales team when a lead has visited your pricing page, or has looked extensively at your product features.
Wishpond makes it easy to track automation metrics, like lead activity and email performance:
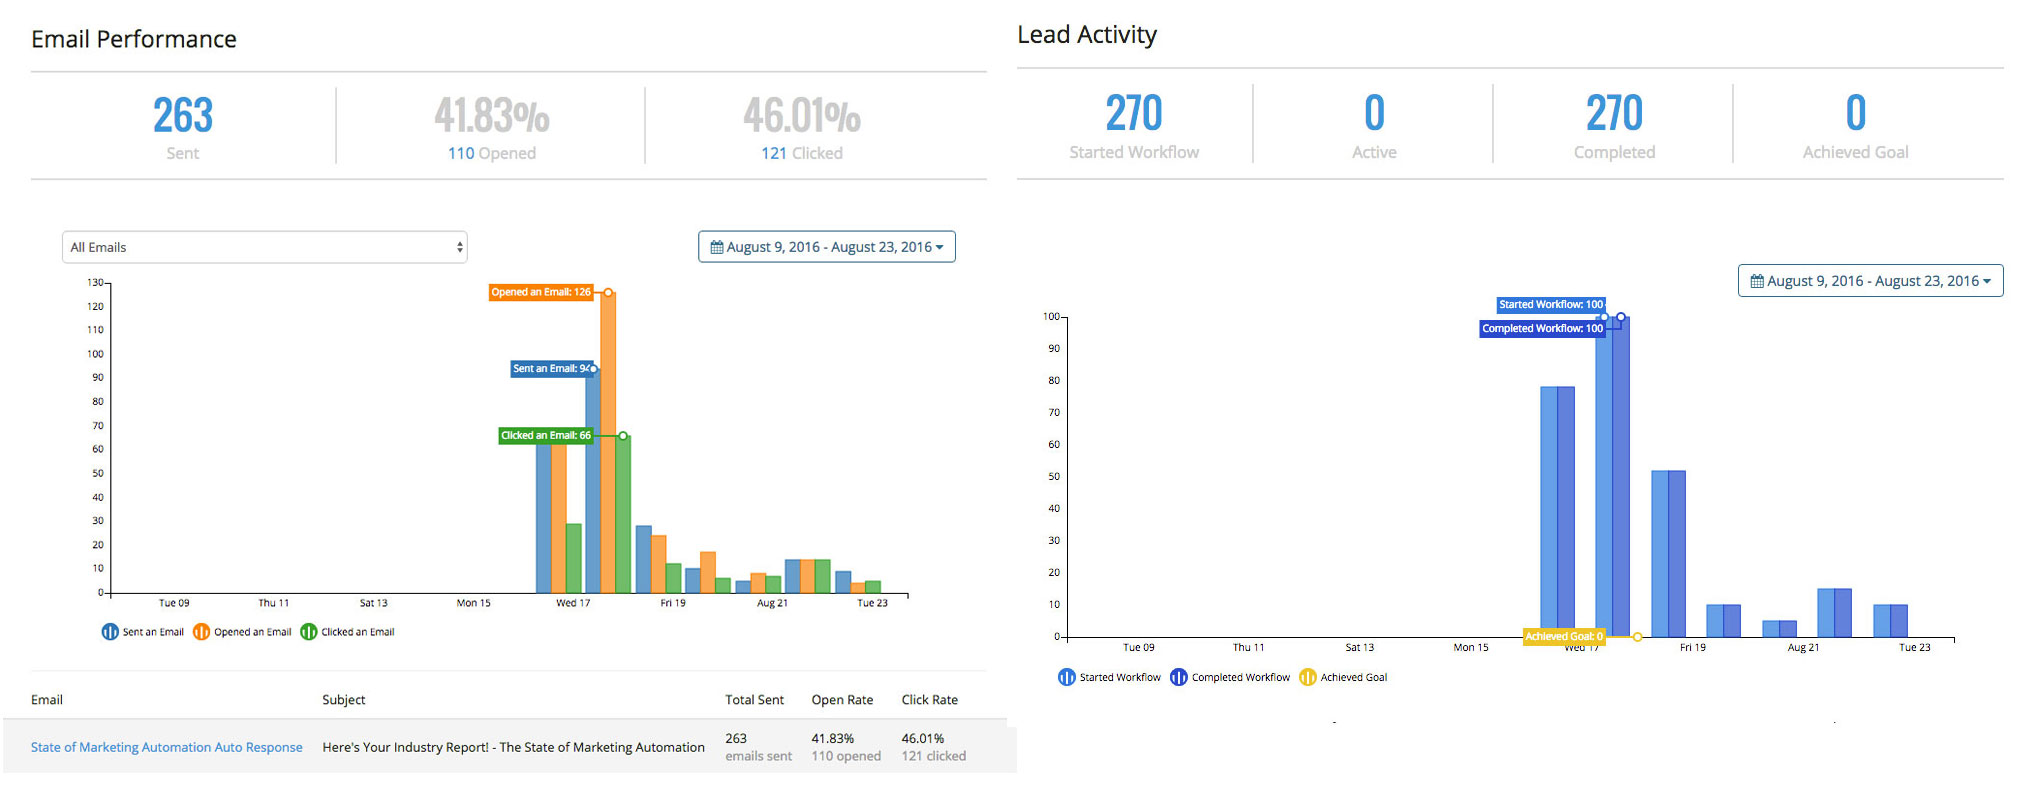
Email marketing automation takes a lot of the guesswork out of communicating with leads – it’s an essential part of any digital marketing strategy, and if you aren’t currently using it, chances are you’re missing out on turning a ton of leads into sales.
Power User Tip #4: Internal Sales Emails for Hot Leads
When most marketers hear “email marketing automation”, they think about sending triggered emails to their leads and customers. However, there’s another often-overlooked use for email marketing automation that I briefly mentioned earlier: internal emails.
Though there are many situations in which automated internal emails might be helpful – for example, sending an email to your support team informing them that a user has visited your support page multiple times – I’ll focus on one in particular: sending emails to your sales team when a “hot lead” is detected.
Hot leads are, as my colleague James puts it, customers “deemed to have a high level of purchase intent”. Here’s his list of ways to qualify a hot lead, taken from his article 5 Ways our Clients Use Marketing Automation to Simplify Success:
- Based on page visit: For instance, someone who viewed your pricing page twice in two days but didn’t convert
- Based on actions: For instance, someone who opened and clicked through a VIP demo email but didn’t sign up for one
- Based on lead information: For instance, someone who has selected the “ready to buy” checkbox within your real estate landing page form.
- Based on lead score: For instance, someone who has A: Visited your pricing page, B: Visited your product page more than once, C: Downloaded a white-paper or comparison guide, and D: Clicked through on a sales email (but not converted). Individually this isn’t enough to label someone a Hot Lead, but, together it’s a strong indicator of strong interest.
- Based on conversations in chat or a demo: Your support team can always manually add a lead to a segment.
Interested in making this a part of your marketing automation toolkit? I’ll walk you through it, since you asked so nicely. Again, if you want to follow along, feel free to hop onto a no-strings-attached 14-day free trial of Wishpond.
Here we go!
After creating a new blank workflow, you’ll want to set your conditions based on the hot lead qualifier you’ve chosen. For this example, I’ll say anyone that’s visited the pricing page twice within the last 15 days is a hot lead. Based on this, I’ll set a Page View condition that looks like this:

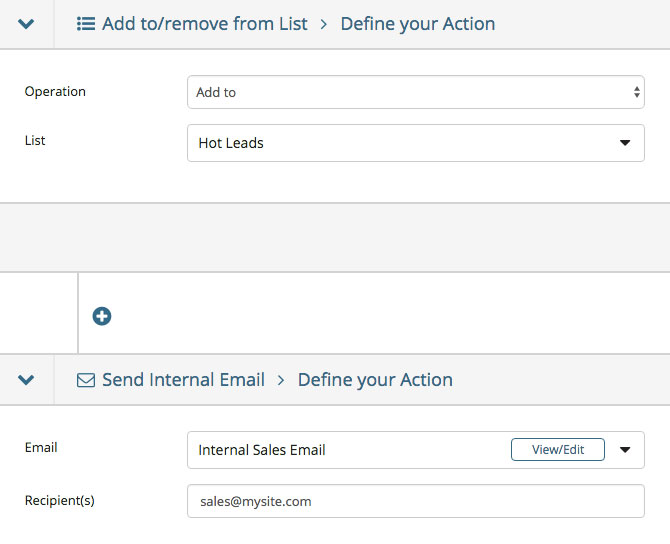
When someone matches this condition, I want to send an email to my sales team to let them know this person is a hot lead, and add them to the list “Hot Leads” so we can keep track of them. We’ll set these events as two separate actions, like this:
That email you’re sending to your sales team can be simple, like “a new lead checked out the pricing page”… but we’re more creative than that! We can use merge tags (an email marketer’s best friend) to give our sales team all of the information they’ll need to turn that hot lead into a sale.
If you’re not sure what merge tags are, think of them like… less vulgar Mad Libs. They dynamically change based on the information in your leads database – for example, the merge tag {{first_name}} becomes “Peter” when we send an email to Peter’s email address if he’s provided us with that information previously.
Here’s a quick example of an internal sales email I’ve put together:
Hey team!
You’ve got a new hot lead. Here’s their information:
Name: {{first_name}}
Email: {{email}}
Business Website: {{business_website}}
Interested In: {{interested_in}}
Rather than having to check the Hot Leads list for each new lead, we’ve automated providing the sales team with their information. They have a way to contact them, a way to see if they’re worth pursuing (their website), and an overview of what they’re interested in to see if their need matches your product.
Run Contests
Purpose:
Engage followers, collect leads and increase awareness

With marketing software suites, it’s easy for marketers like you and I to run a ton of different types of contests and promotions. As you’re probably aware, running contests, especially on social media, can be a great way to increase social engagement and awareness within your industry.
A good landing page builder will make creating a contest simple. In Wishpond, you can create contests using a drag-and-drop editor, just like a landing page or popup. Wishpond offers more than 10 different contest types.
When running a contest, your best bet is one of our two most popular contests:
- Sweepstakes: Basically any contest with a random winner. Sweepstakes are so popular because they’re easy to set up and run – participants just need to provide the information you asked for, and they’re automatically entered to win. Because there’s not a lot of effort necessary on the part of the entrant, conversion rates are often pretty high.
- Photo contests: Photo contests are great because they help you collect user-generated content from entrants, which you can use in your future marketing efforts.
You’ve made it this far through the article, so I won’t bore you any more by explaining Wishpond’s drag-and-drop editor. Design your contest landing page like you would any other landing page, and when you’re done, press “Next” to head into the contest settings page.
Here, you’ll have a few decisions to make. Besides naming your contest, you’ll have to choose where you want to host your campaign – you can do this on a custom Wishpond subdomain, your own domain; or on Facebook or Twitter, among other options. Other options include requiring voters to log into Facebook, displaying a Facebook Share popup after entry, and choosing between different photo upload methods.
Once you’ve fixed up your contest just the way you want it, you’re good to go! Entries will appear on your landing page in a gallery for others to vote on. Here’s an example from a contest by Pet Supplies Plus:
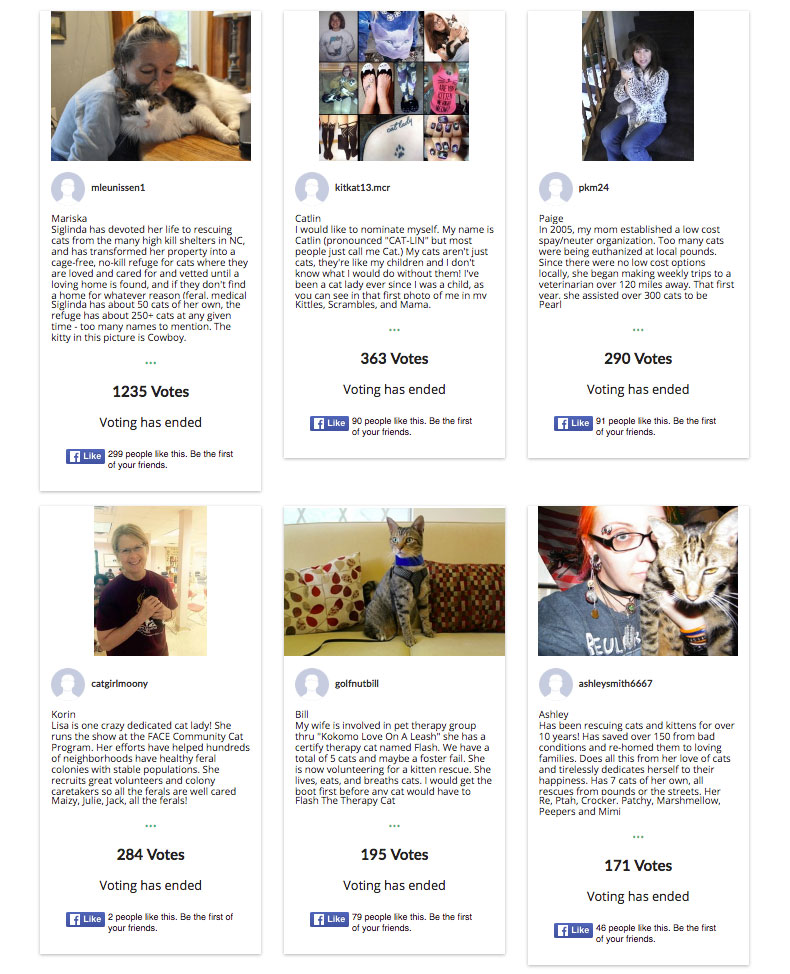
And here’s what an individual entry looks like:
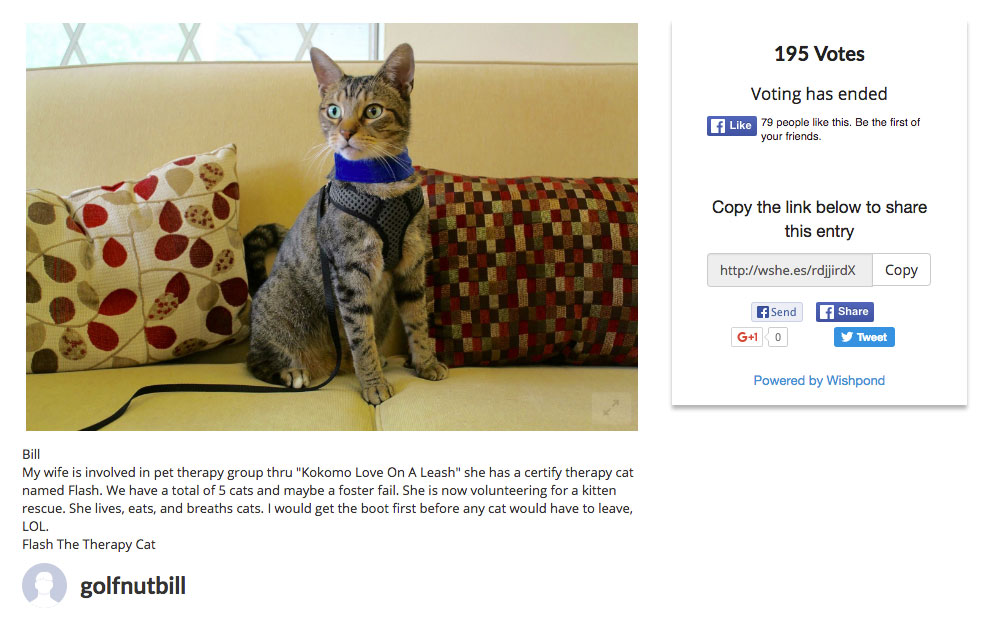
As you can see, Wishpond’s contest builder makes it easy for participants – both entrants and voters – to share entries on social media, which can be a great way to organically spread brand awareness.
If you’re running a contest, don’t miss our free Contest Rules Generator tool!
Power User Tip #5: Instant-Win Sweepstakes
There’s another contest type you can get out of Wishpond’s contest platform through a little bit of hacking. I’m calling it an “instant-win sweepstakes”. Basically, if you’re looking to pick winners for a discount or free product code, we can hack Wishpond’s coupon tool to randomize the process – and more importantly, make it instant.
Here’s how it works. If you don’t have a Wishpond account, don’t forget you can sign up for a free trial here so you can follow along! This is definitely a more advanced tip, but I’ll try to make it as clear as possible.
First, create a new plain-text document in Notepad or TextEdit. Choose some sort of way to indicate a “losing” entry. In my example here, I’m using NOTAWINNER followed by a number (e.g. NOTAWINNER01, NOTAWINNER02, etc.). I used this number generator tool to append numbers to the end of my losing coupon codes.
We need to make each of these coupons unique because the Wishpond platform thinks you’re introducing multiple unique coupon codes. Little does it know, we’re hacking it to create an instant contest!
The number of lines of “losing” text you generate determines how many people can try their luck. For example, I’ve got 10 winning coupon codes and 90 “losing” lines, meaning 100 total people can enter. Here’s a tool I found to append numbers to the end of text in case you’ve got a lot of lines to generate.
This is what it should look like:

Now, you’ll want to take your working coupon codes and place them in your text document between lines of losing text. You can do it manually, or use a site like Random.org to randomize the lines. Once that’s taken care of, save the text in a .txt file. We’re ready to hop into the Wishpond platform!
Let’s start by creating a coupon promotion from the Wishpond dashboard by clicking the Social Promotion button. From here, you’ll be prompted to select one of over 30 gorgeous templates. I’m picking Bakery Pro for this example, because who doesn’t love well-formatted carbs?
From here, you can either make some changes to the template or leave it as is. I’d recommend including a note saying something like “If your code says ‘NOTAWINNER’, you’re not a winner!”, or at the very least some copy that indicates there’s a chance entrants may not get anything, like this:

Something I’d recommend doing is including a consolation prize – make your “loser text” another discount code or some other lesser prize, so every entrant feels like they’ve earned at least some value from your contest. You can also just email non-winners once the contest is over with a consolation prize.
Either way, make sure you try to minimize disappointment – by making all entrants feel like winners, you’ll increase the chance that they’ll consider your brand in future purchase decisions.
Once you’ve designed your contest landing page, press “Next” and you’ll be greeted with the contest options page. Make sure to limit the “Maximum participants allowed” to the number of lines of text you have. Under the “Use coupon codes” section, choose “Upload your own coupon codes” and upload the .txt file we created previously. Basically, each entrant will get one “line” of the text file – so if they’ve won, they’ll be given a winning code they can put to use right away.
That’s it! All you need to do is publish your contest page and you’re good to go. Here’s an example of what a coupon winner might see:

Conclusion
Phew – if you’ve made it this far, I’d like to thank you for reading! I hope you learned a few new things along the way.
If you have questions about any of the tips or Wishpond, feel free to leave a comment or reach me directly at [email protected]!
Let’s talk! Join the discussion on GrowthHackers and Inbound!