
Real estate sales funnels can be exhausting to set up and keep track of. You have so many properties to keep an eye on and so much follow-up it’s almost unbelievable.
How can any one person do even half of this and also sleep?
Let me simplify the process. This 7-step funnel creation involves a bit of automation, a bit of shortcutting,, and a lot of improved ROI.
We’ll break down:
- Creating a landing pages for each of your properties
- Creating a popup prompting visitors to subscribe to your newsletter
- Creating a newsletter sent to that specific segment of leads
- Automatically sending an internal and external email as soon as a lead engages
- Setting up a remarketing campaign on Facebook
- Setting up a remarketing campaign on Google
- Creating a second-stage landing page optimized for return traffic
Related: 5 Must-Have Facebook Tips For Lead Hungry Real Estate Agents
Why Create a Complete Real Estate Sales Funnel?
The best analogy is that of a fisherman.
You throw out your bait (the property) and you see how many fish are interested in biting. They all gather around and you throw your net.
Imagine your sales funnel as the net you throw. Some of the fish may be too small to be caught and they’ll wriggle out, and that’s okay because you don’t want those fish anyway. However, unless you’ve invested in your net, some really great fish (that you wanted to keep) might slip through the holes as well.
An optimized real estate sales funnel is like a net without holes. Sure, you may throw some back because they’re not exactly right for your dinner table, but at least you’ve given yourself the best possible chance of finding success on the water.
Here’s a quick diagram showing you how it works:

Step 1: Create a landing pages for each of your properties
The idea of a property directory will be familiar to every realtor or real estate agent out there. Unfortunately, those pages aren’t particularly optimized for your traffic to engage.
So we have property pages (again, a familiar concept).
But an optimized real estate sales funnel considers more than just placing the information prospective buyers need. We also consider how our visitors will be engaging with that page and what they might want from it.
Here’s an example I made in about half an hour with Wishpond’s landing page builder:
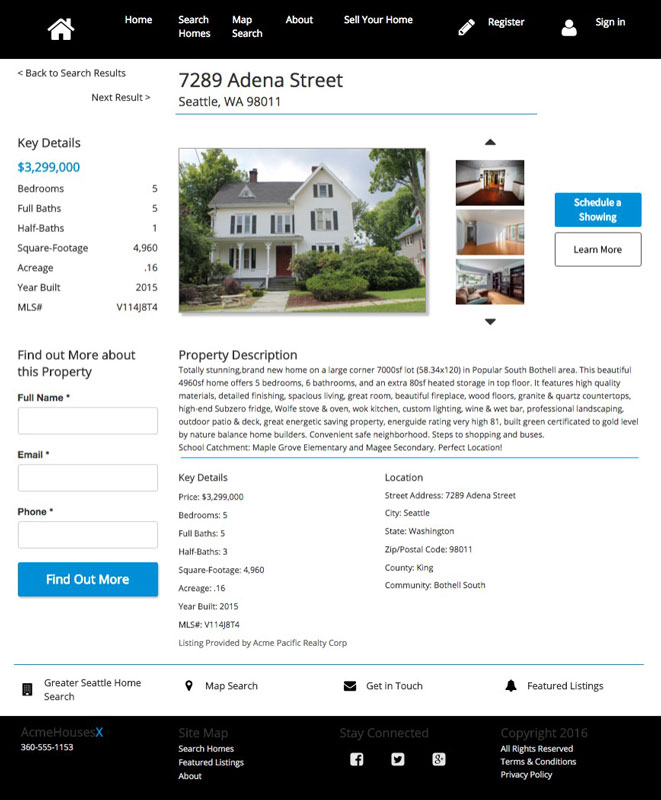
The URL of this property landing page will be “https://www.acmehomesx.com/seattle/7289-adena-street.” This will be important down the line.
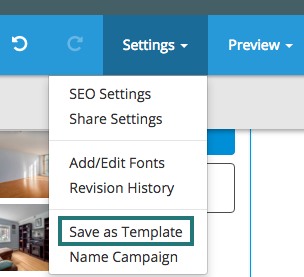
Once you’ve created a landing page that you like you can save it as a template to your account. This allows you to very easily create new, optimized landing pages for each of your properties. ~~~~~~~~~~~>
Remember to A/B test your primary property page template heavily. Simply choose the property page with the highest traffic and alter things like CTA color and placement, headline, number of form fields, etc. Once your A/B test has come to statistical significance (95%), apply what you learned to your other property pages.
Step 2: Create a popup prompting visitors to subscribe to your newsletter
Much of an optimized sales funnel is about limiting the holes in the net. Intelligently using popups is one of the primary ways we do that.
Exit, entry, scroll and click popups all have their place within an optimized real estate sales funnel.
For instance…
- Exit Popups: Add exit popups to your property pages which prompt prospective buyers to subscribe to receive updates about that specific property or properties in the area.
- Entry Popups: Add a subscription popup to appear as soon as someone arrives, mentioning that subscribers receive the most up-to-date real estate information, before it’s added to your site.
- Scroll Popups: Add scroll popups to your property directory page driving people to subscribe. Set your scroll popup to trigger between 30% and 50% of the way down the page, so they’ve seen the breadth of your listings and also appreciate how complicated real estate can be.
- Click Popups: Test implementing click popups for your page CTAs. Rather than having your form on the original property page, put it in a click popup and have the page’s CTA trigger that popup. This strategy has doubled our blog conversion rates in the past six months.
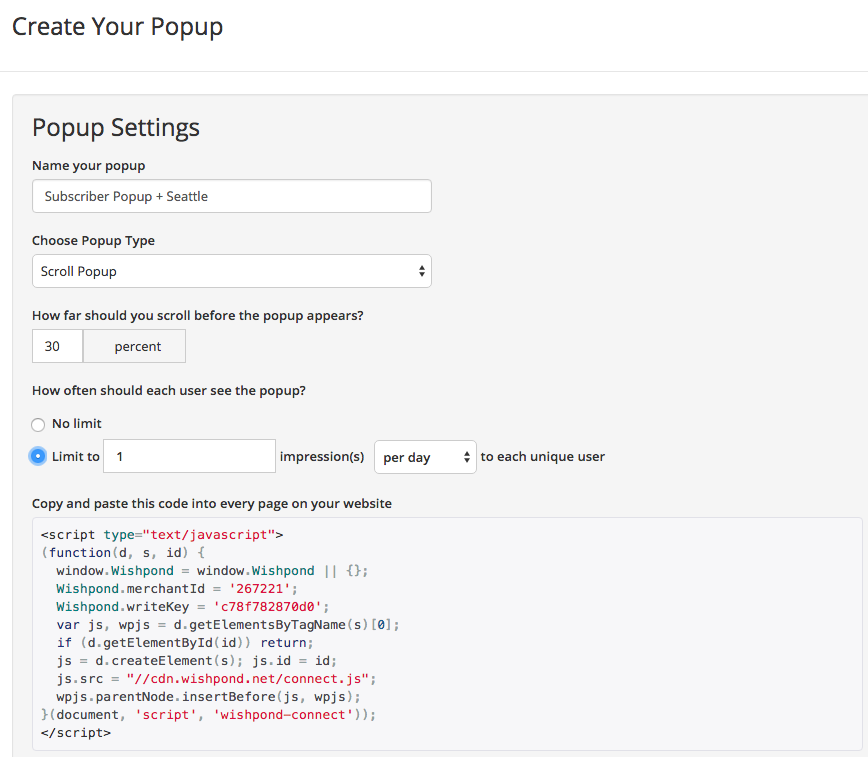
Here’s a subscriber popup I created in Wishpond in only a few minutes:
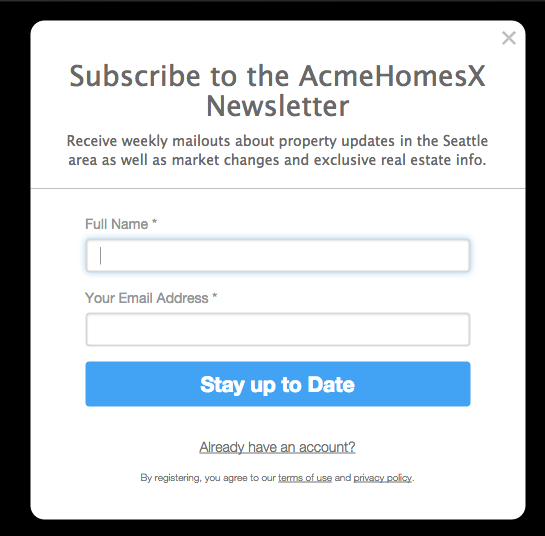
I choose “scroll popup” from the advanced settings screen, set my scroll percentage and limit, and copy and paste the popup code into the backend of my site’s code (between the <header> and </header> tags, if I haven’t already done it).
In order to add this popup to all properties with the word “Seattle” in the URL (remember when I told you that would be important?), I simply set it to appear when the URL contains that word. Like so:

Step 3: Create a newsletter sent to that specific segment of leads
Each campaign (landing page or popup) should generate its own list of leads within your marketing platform. This makes it super easy to segment leads, as you know exactly where they’ve come from and what they’re interested in.
For the popup above, we’ve created a Seattle-specific campaign, so we have a Seattle-specific segment of leads to whom we can communicate specifically.
Segmentation is vital to a successful email campaign (particularly when we’re talking about real estate, which is only relevant if we’re talking to people about the area they’re actually interested in).
When Mailchimp measured segmented email campaigns across their entire platform, these were their results:
| Opens | 14.64% higher than non-segmented campaigns |
| Unique Opens | 10.68% higher than non-segmented campaigns |
| Clicks | 59.99% higher than non-segmented campaigns |
| Bounces | 0.02% lower than non-segmented campaigns |
| Abuse Reports | 6.15% lower than non-segmented campaigns |
| Unsubscribes | 7.46% lower than non-segmented campaigns |
Here are the conditions we’d set for a newsletter mailout to leads interested in Seattle properties:
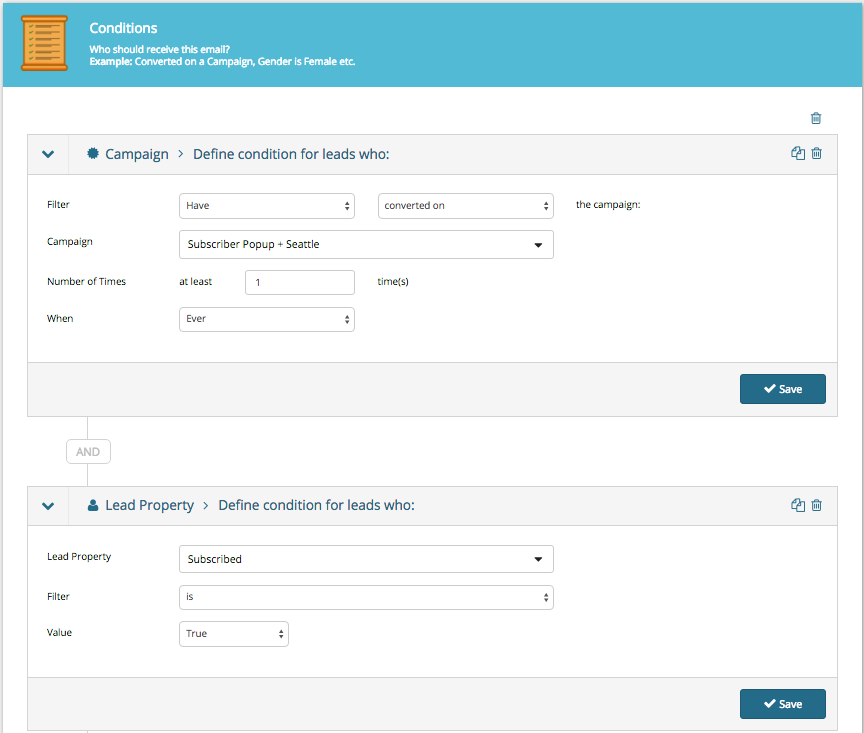
Notice that I’ve also made sure that recipients are actually subscribers. If people initially subscribed and then unsubscribed the last thing I want to do is spam them (not just because you’ll get a bad reputation, but because being manually placed in a recipient’s spam folder increases the chance you’ll be automatically placed there in the future).
I can also manually create a list of all subscribers by combining individual campaign lists into one larger one. This would allow me to reach out to all subscribers about general real estate market reports, business updates, etc.
Your newsletter email would have a few property options (with thumbnail) which, when clicked upon, would send leads through to either those property’s main property landing pages, or their specific remarketing landing pages (step #7) depending on how those pages test.
More on that in a second though.

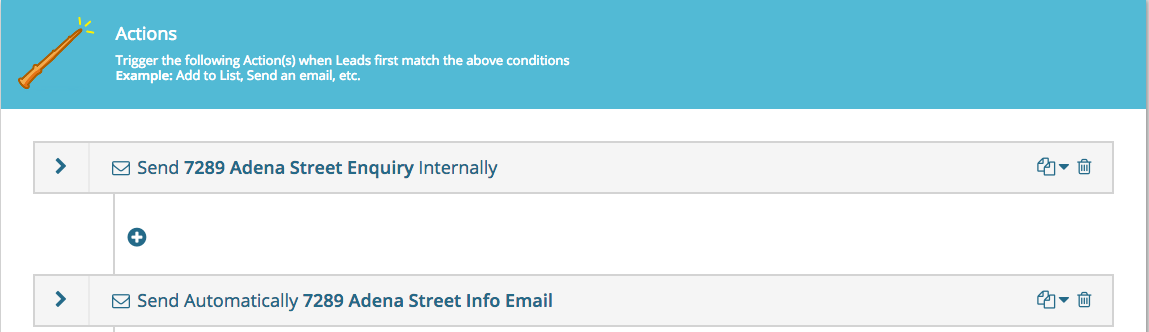
Step 4: Send an internal and external email
If your leads fill out the form and convert on the “Find out more” CTA button on your property landing page, you should be informed immediately.
Firstly, let’s set the marketing automation workflow to automatically deliver both an internal email to either ourselves or the agent associated with the property, as well as an external email which would contain more information on the property and prompt them to get in touch for a viewing.

Step 5: Remarket to interested leads on Facebook
If someone doesn’t click on any of the CTAs on your property page (including your popup), historically they were a lost visitor. There was nothing you could do to recapture their interest or drive them back to your site.
With remarketing on the Facebook or Google platform, however, that’s no longer the case.
Facebook’s Website Custom Audiences tool enables real estate marketers like you to create an entire ad campaign focused on people who visited your site but didn’t convert.
You can show them ads built directly around the housing market they’re interested in and drive them back to your site.
Facebook Remarketing Use-Case for the Real Estate Market:
- Grab the pixel provided by Facebook Ads and paste it into your site.
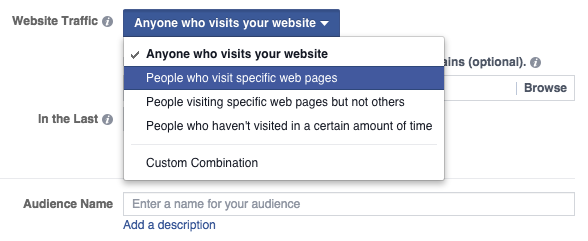
- Within Facebook’s Power Editor, choose “people visiting specific web pages but not others.”
- Select “URL phrase match = Seattle” BUT NOT the page which your page’s buttons link to.
- Create an ad set within Facebook Ads which targets your custom audience.
- Within that ad set, create a Facebook Ad with a headline like “Be the first to hear about new properties in Seattle.”
- Set your ad budget to about $20 a day (it’s incredibly unlikely you’ll reach that daily budget, and Facebook charges by the click).
- Launch!
Website custom audience targeting on Facebook is one of the main ways you can fill one of the holes in your real estate sales funnel net.
Step 6: Remarket to interested leads on Google
While running Facebook Ads is a great way to recapture bounced website traffic, it’s only one avenue. Let’s cover our bases, shall we?
Google has its own (larger) remarketing platform within Google Adwords. It enables you to put your advertisements in front of previous site visitors within the entire Google display ad network (hundreds of thousands of sites).
How to remarket with Google:
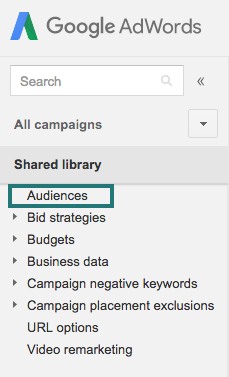
Step 1: Head to “Audiences” under “Shared Library” on the left side of your Adwords dashboard:
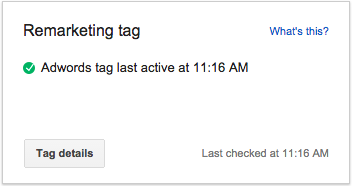
Step 2: Find “Remarketing Tag” on the top right of the dashboard and click “Tag details:”
Step 3: Follow Google’s instructions for copying and pasting the remarketing tag into your site:
![]()
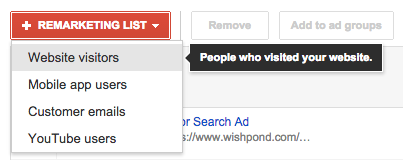
Step 4: Once you’ve tested your pixel, head back to the Audiences tab and click “Remarketing List” and then “Website Visitors”:
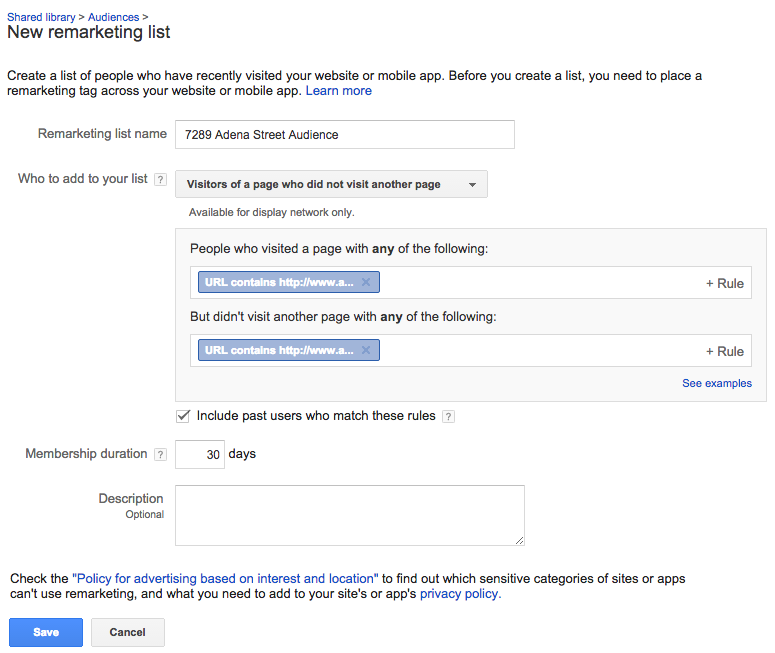
Step 5: Name your audience and select (like with Facebook) the page you want people to have visited as well as the one you need them to not have:
Step 6: Create a display ad with similar copy to that of your Facebook Ad.
Step 7: Create a second-stage landing page optimized for return traffic
For your email campaigns as well as your remarketing ad campaigns you need an optimized page to send people back to.
Now, you could simply use the original property page we created in Step 1. That would probably be fine, and depending on how it tests, I have nothing against that.
But it’s definitely worth testing creating a second-stage-specific landing page as well.
A second-stage landing page is optimized for people who have already viewed your property pages and expressed some interest.
It has fewer CTAs than the original property page as well as a limited nav bar. It also includes some update notices about the status of the property.
Something like this:

Second-stage landing pages like this one are very easy to create, as you already have your property page saved as a template. Simply remove a few of the page’s elements (CTA’s, nav bar links, etc) and add in some urgency.
The primary thing to remember with both your second-stage landing page and your original property page is that both need to be tested. It’s possible that you’ll drive remarketing traffic to a second-stage page but not email traffic, or visa versa.
Test it!
Wrapping it Up:
Hopefully that’s given you a better, more comprehensive, idea of how a real estate sales funnel might be set up.
If you have any questions about any of these sections or want to talk to a marketing expert about getting set up, reach out in the comment section below and I’d be happy to help you out.
Related Reading
- The Foundational Guide to Your Online Marketing and Sales Funnel
- The 2016 Complete Facebook Ads Guide
- 10 Google AdWords Mistakes You Need to Avoid: Beginners Guide
- Social Media for Real Estate Agents: 21 Tips
- 10 (Great and Terrible) Real Estate Landing Page Examples Critiqued
- 40 Real Estate Lead Generation Strategies