

Let’s pretend for a second that I am the marketing manager for a yoga studio called Zen Yoga. We have three branches in the Vancouver area.
We’ve done pretty well, but are looking to get more out of this little thing we call digital marketing.
Sound familiar?
This article will walk you through the steps you need to take to create a successful online marketing campaign.
I’ll be using Wishpond’s marketing campaign tool to do 5 of the 6 steps here, but you can use another platform or do it all by hand, if you have the ability!
Let’s get rolling!
The Zen Yoga Campaign
Zen Yoga (again, a business I totally made up) is looking to boost online engagement and drive Fall sales.
Their Website:
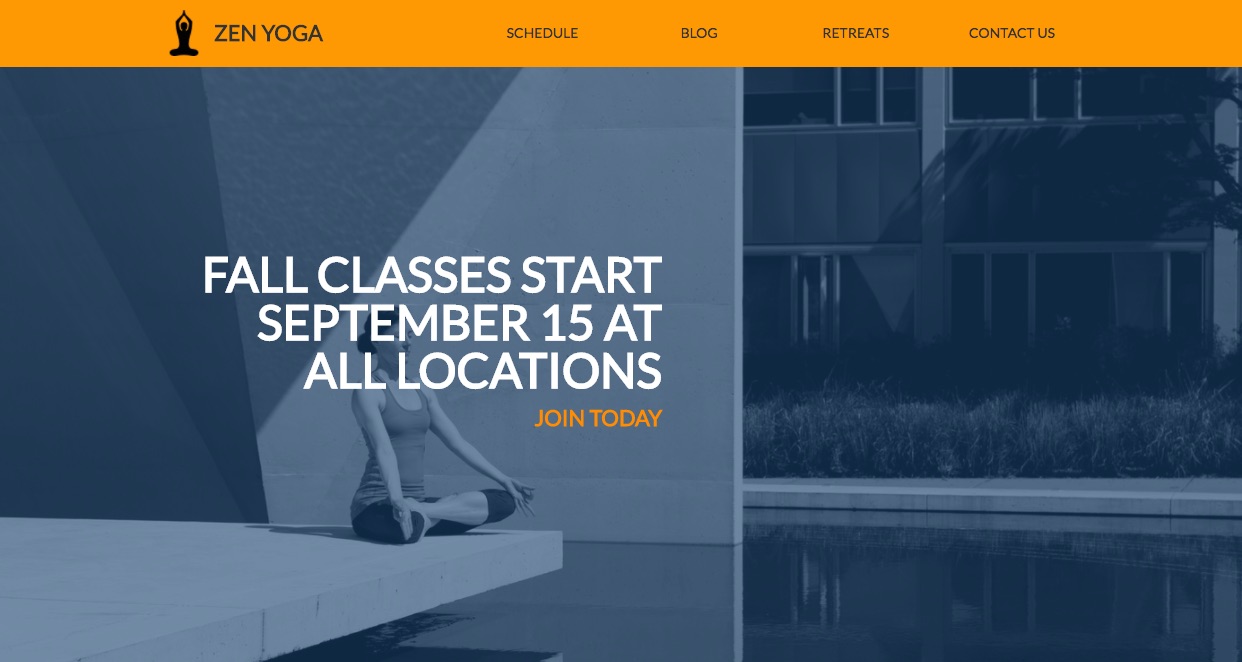
You can see the full website (I actually made the whole thing on Wishpond, because I just genuinely like playing around on the builder) at https://try.wishpond.com/zen-yoga/.
The Campaign They Want to Run:
- Campaign Focus: “Get 50% Off 6-Months of Yoga When You Bring a Friend!”
- Goal: Drive 100 new clients
- Budget: $1000
- Target Market: Women, Aged 18-65
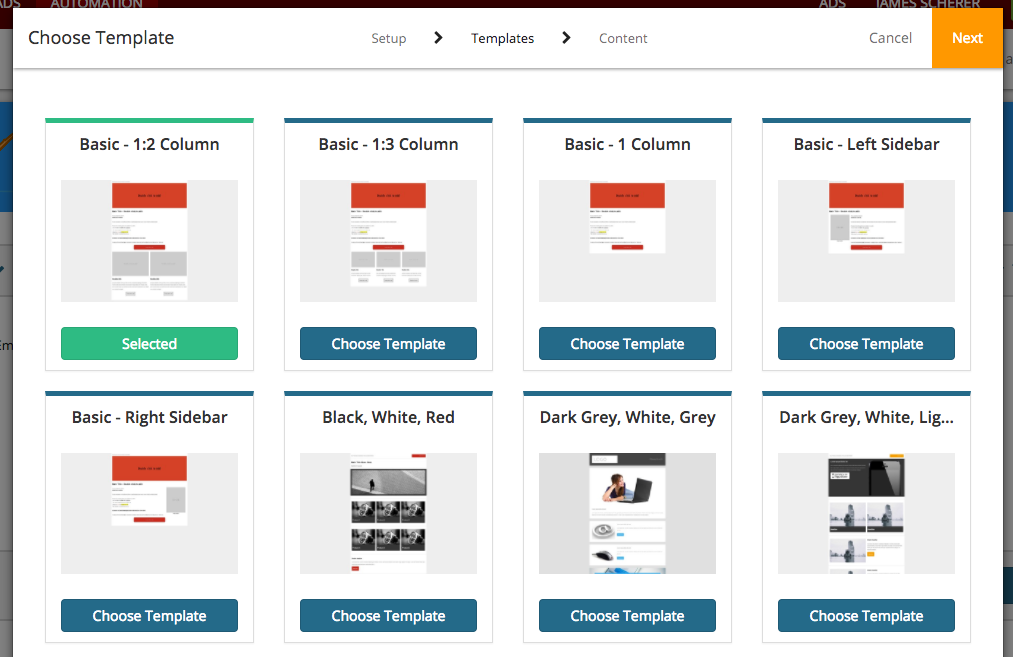
Step 1: Create your Campaign Page
Head into Wishpond (or wherever you’re building your campaign page) and select a template which matches best with your existing website, or requires the smallest amount of changes to work for what you have in mind.
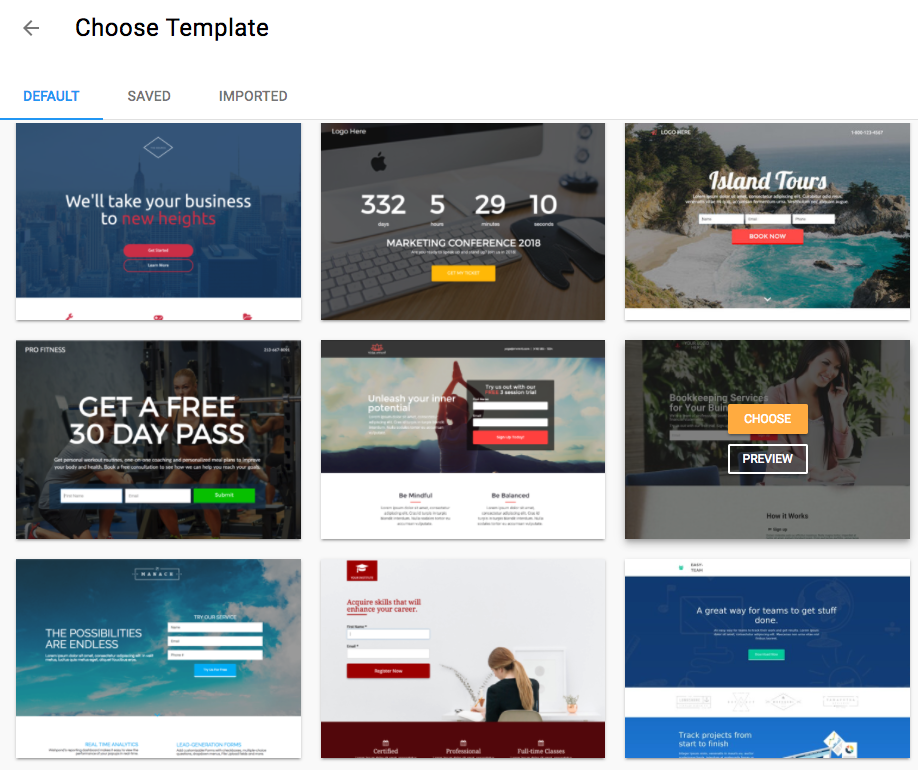
Once you’re in, play around with the drag-and-drop functionality and column system and then create your campaign page.
Here’s the one I created for Zen Yoga:
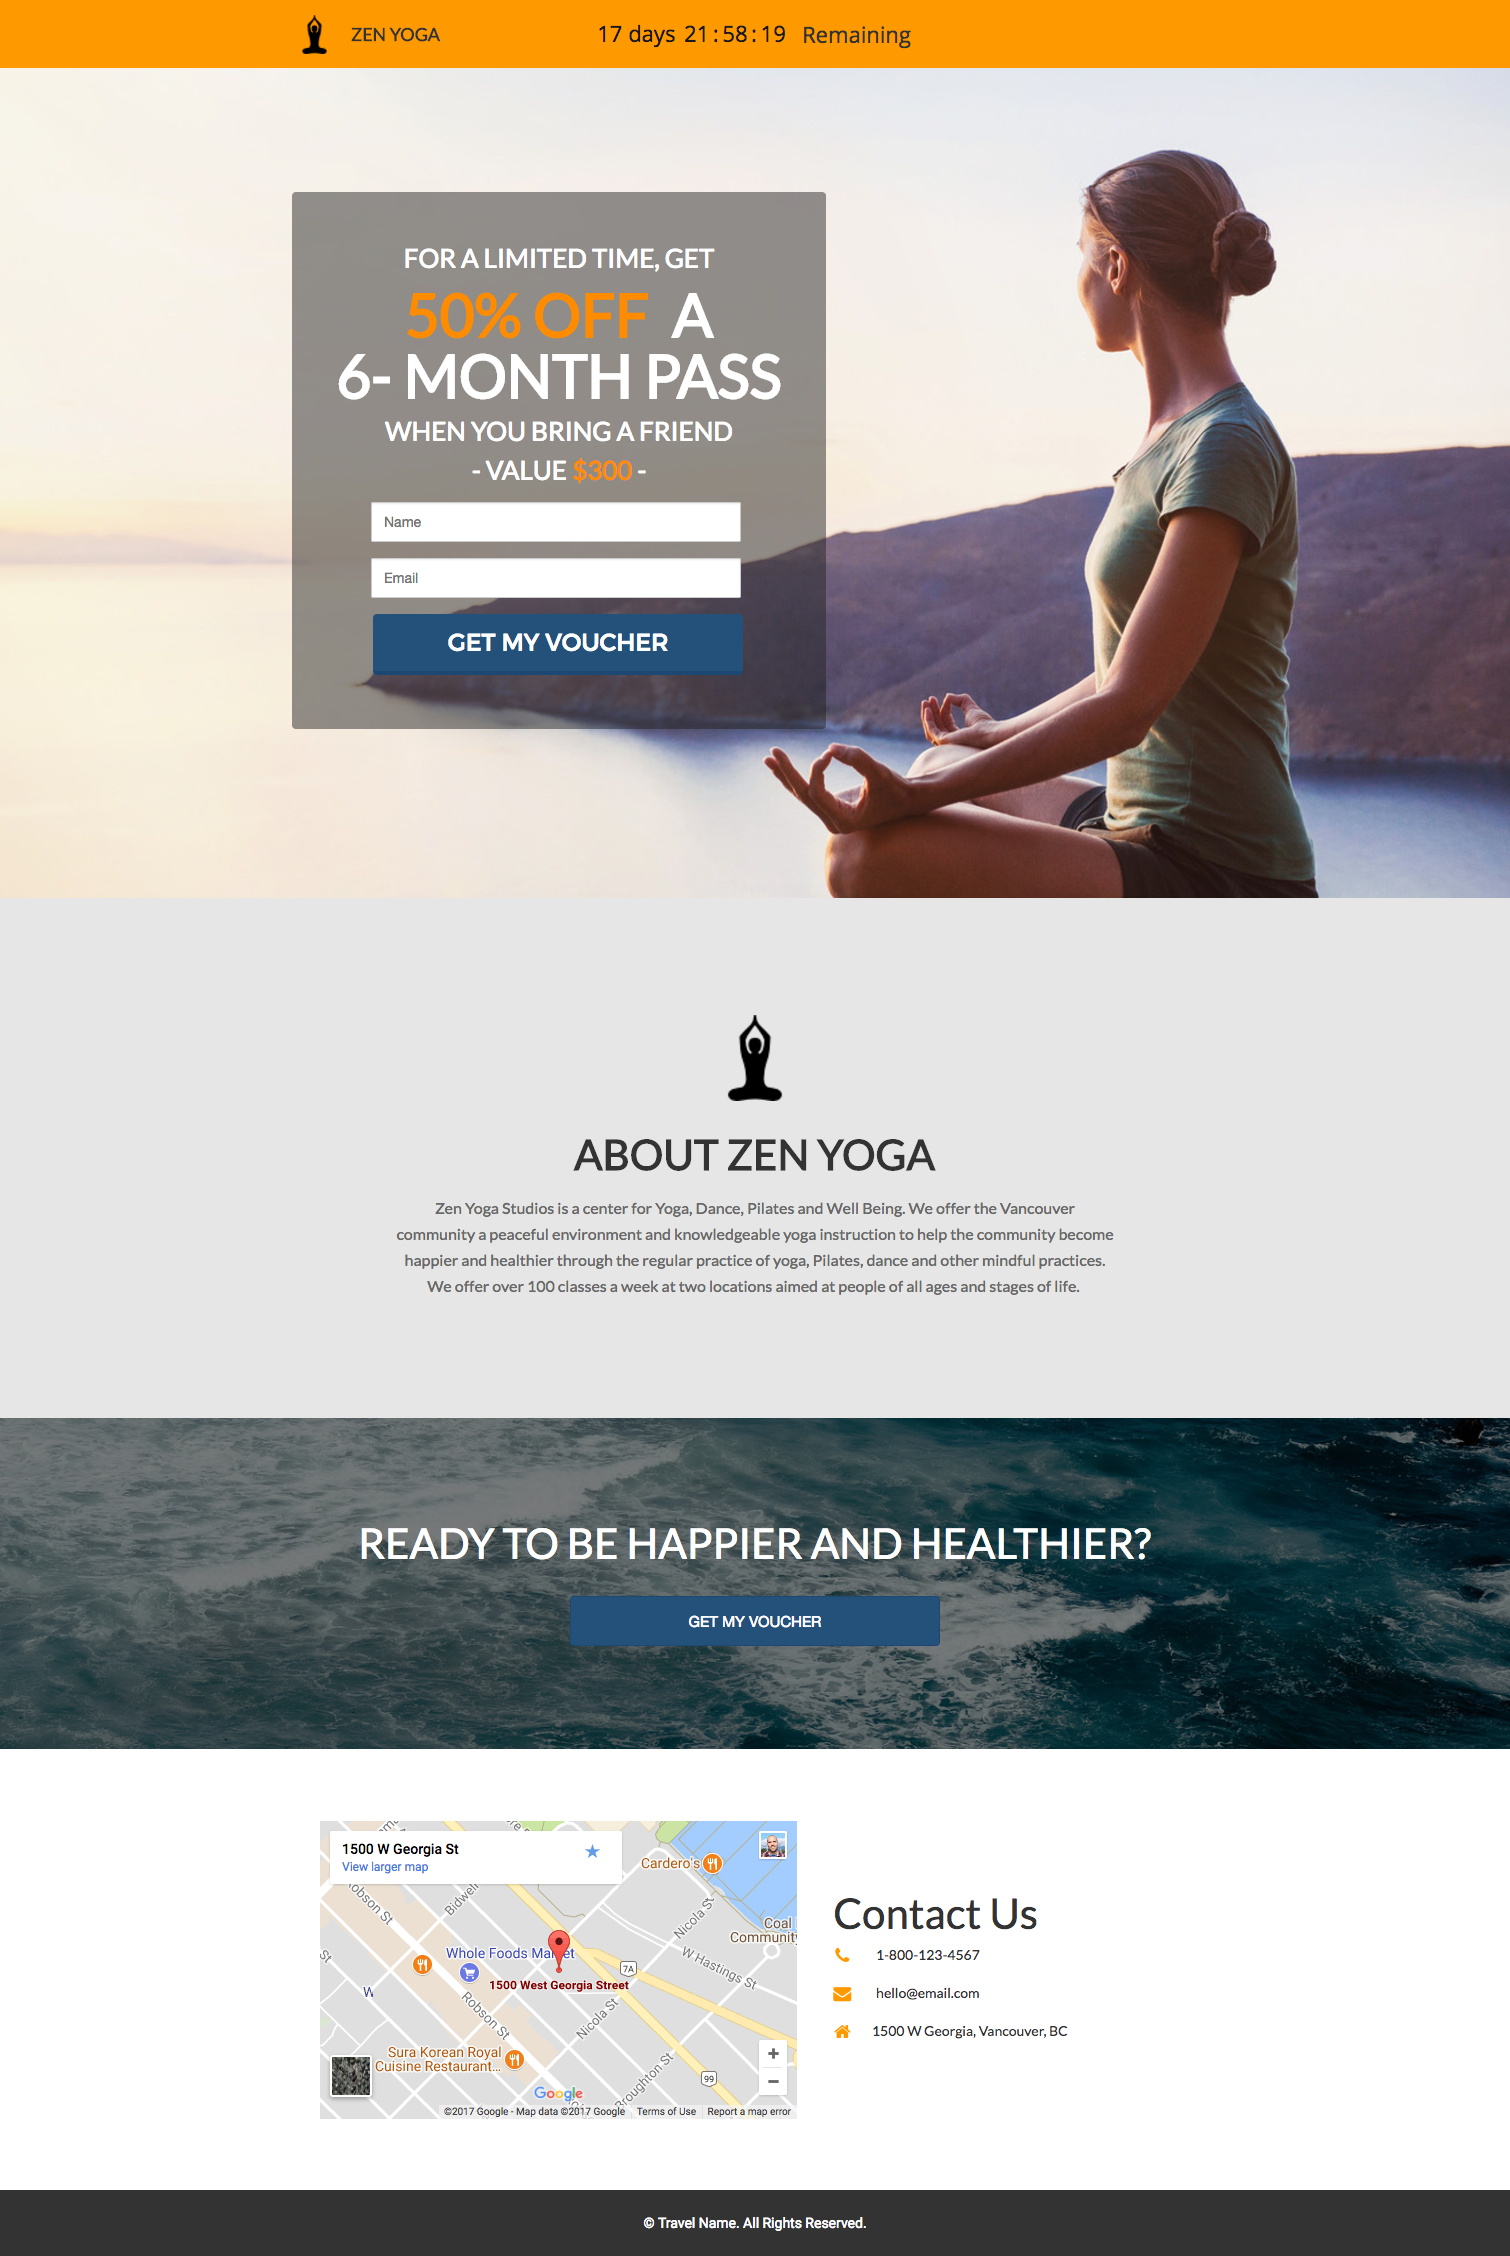
Essential Elements of a Successful Online Marketing Campaign:
- Value-Oriented Headline: When running any discount promotion, be sure the dollar value of that discount (or percent-off) is front and center. Don’t hide your campaign’s value.
- Hero Image with a Person: People respond to people. Where possible, communicate the appeal of your product by showing someone happily using it.
- Consistent Design Scheme: The font, call-to-action and accent colors are all consistent between this page and Zen Yoga’s homepage. Be sure to retain your brand’s design and style consistency when creating your promotion pages. Once created, you can always duplicate campaigns within Wishpond, by the way. This makes it way faster to get rolling with your next one.
- Countdown Timer: Countdown timers create urgency, and address the primary reason that people don’t convert on your campaign pages – laziness.
- No External Navigation: You don’t your campaign page visitors to be able to easily navigate away from the conversion goal. Drop your top navigation bar (on WordPress, you’ll need to change your Page Theme) and ensure that the only buttons on the page are for your campaign goal.
- Few fields: This campaign asks only for name and email address. I want the maximum number of visitors to convert and become prospective customers, and asking for more lead information would only drop my conversion rates.
By the way, I used Pexels.com to get that free, high quality background image.
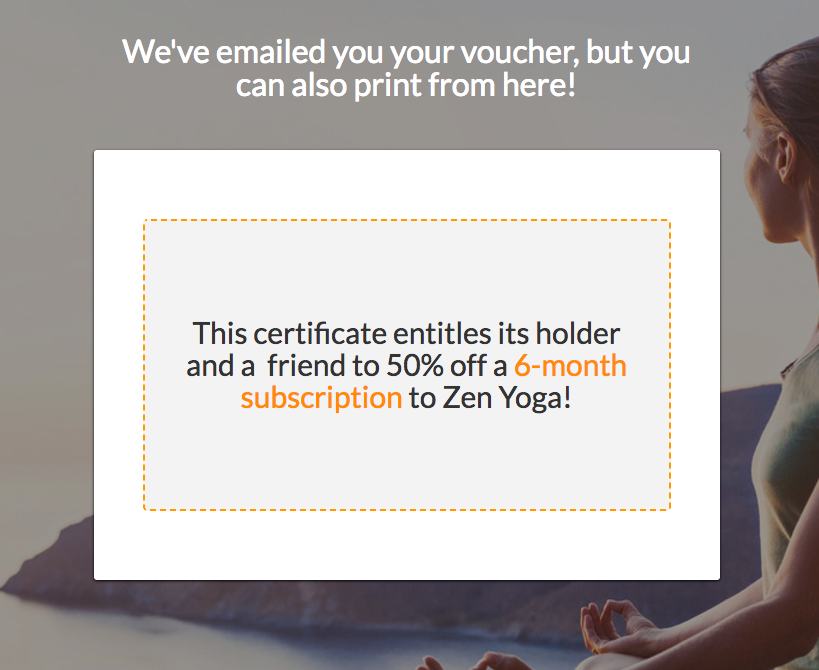
Step 2: Create your Thank You Page and Voucher
You now need the “next step” page: the page people go to once they’ve submitted their lead information and clicked “Get My Voucher.”
We’ll set up the auto-responder email in a second, but for now, simply create a box that looks like a voucher and add it to your campaign’s Thank You page.
Something like this…
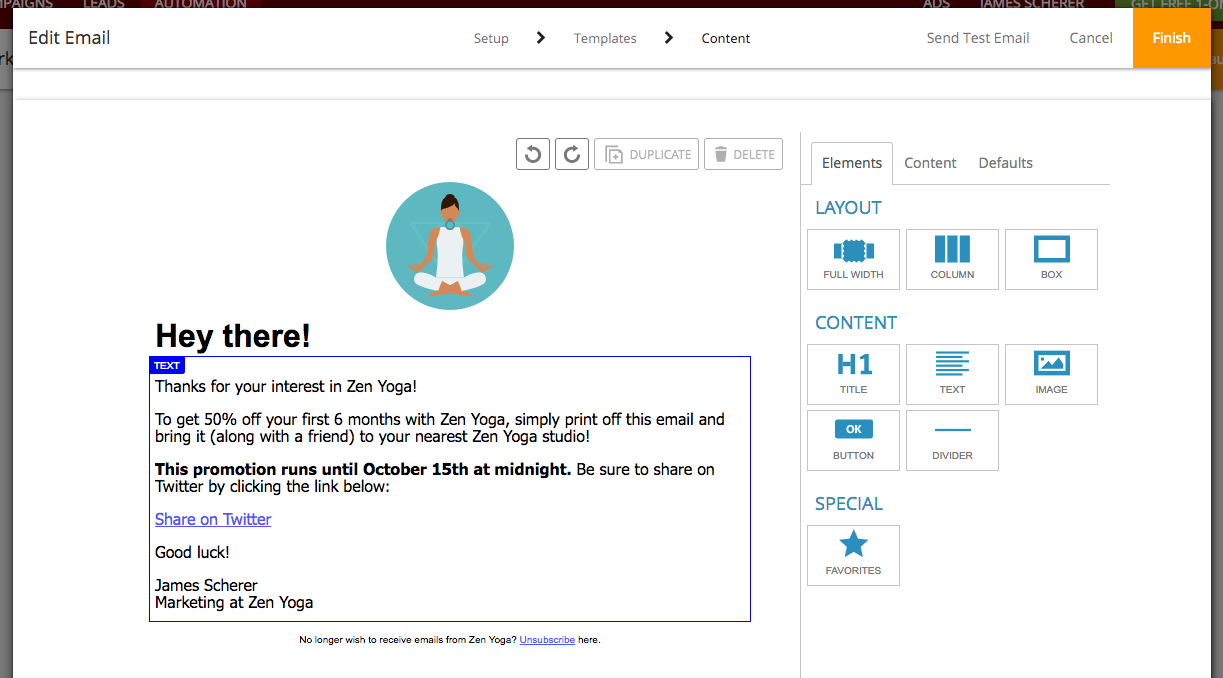
Step 3: Create your Auto-Responder Email
A little bit of marketing automation never hurt anybody (in fact, [78% of marketers](https://info.spearmarketing.com/marketing-automation-survey-report.html) say it increases revenue), and creating an auto-responder email is one of the easiest ways to implement it.
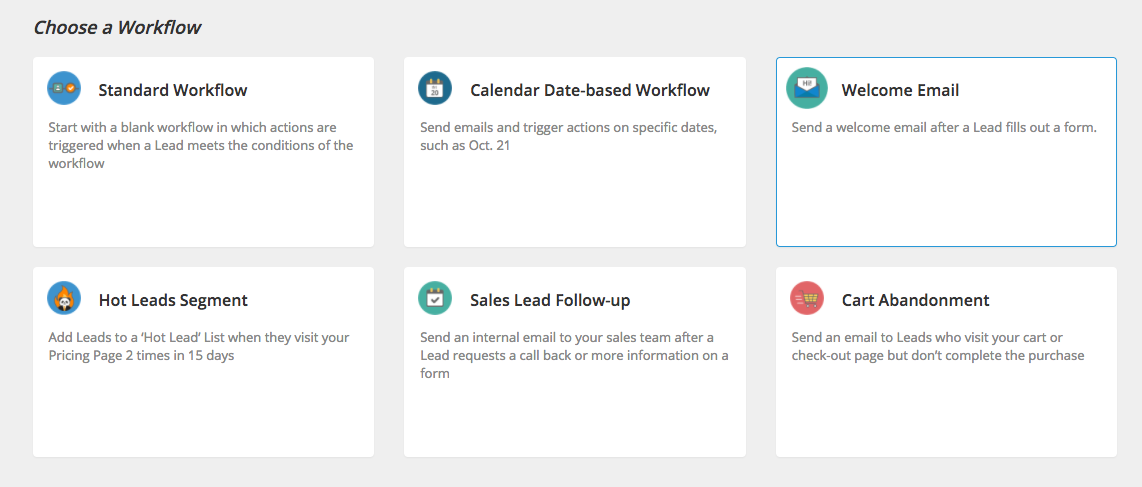
Step 1: Head into your automation dashboard and click on the “Welcome Email” automation template:
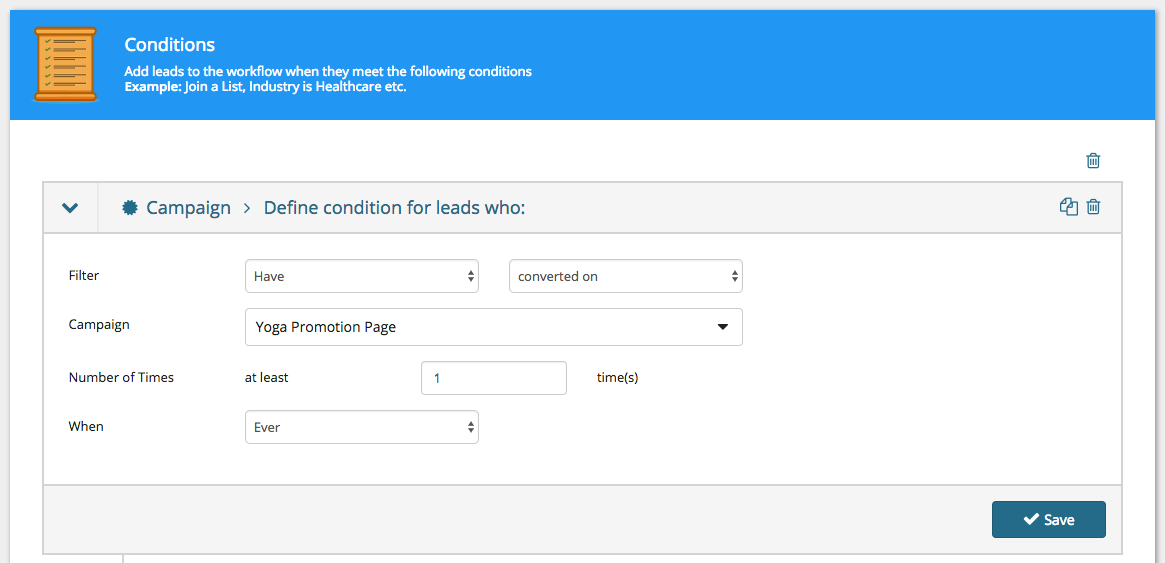
Step 2: Define the conditions for your auto-responder. Essentially, this is “when [X] thing happens…”
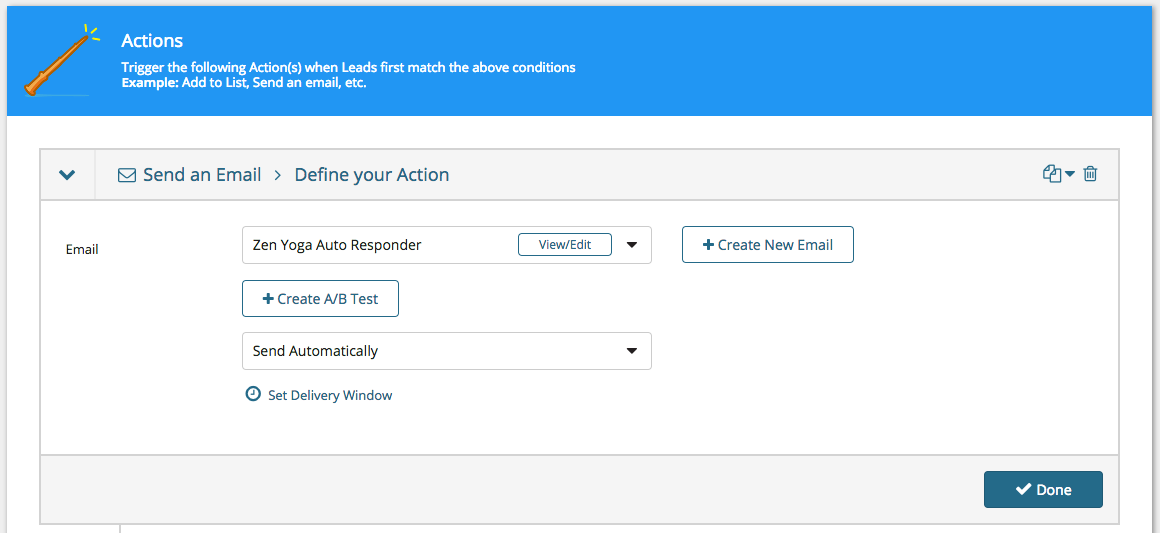
Step 3: Define the Actions for your auto-responder. This is the “do this thing…”
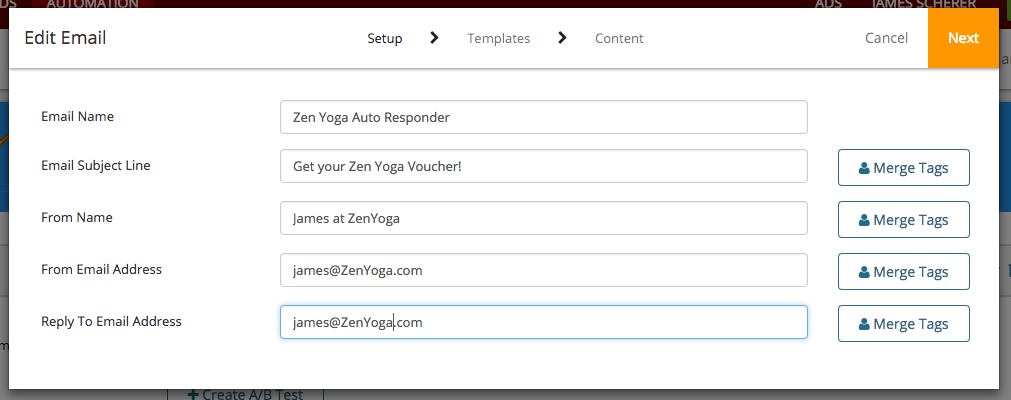
Step 4: Head to the setup options. Name your email, select your subject line and “From” name:
Step 5: Click on “Create new Email” within the Actions dropdown and select your email template from the options:
Step 6: Write your email
Step 6: Send a test to check it looks good

Hit “Launch Workflow” and you’re good to go!
Another Cool Tip…
I’d also send a newsletter to my entire list (this can also be done within Wishpond’s email marketing tool) to notify everyone of my promotion. A top tip would be to segment your existing list into “People who have a Current Subscription” and “Former Customers” and then send this promotion solely to the Former Customers segment to get them back in the fold.
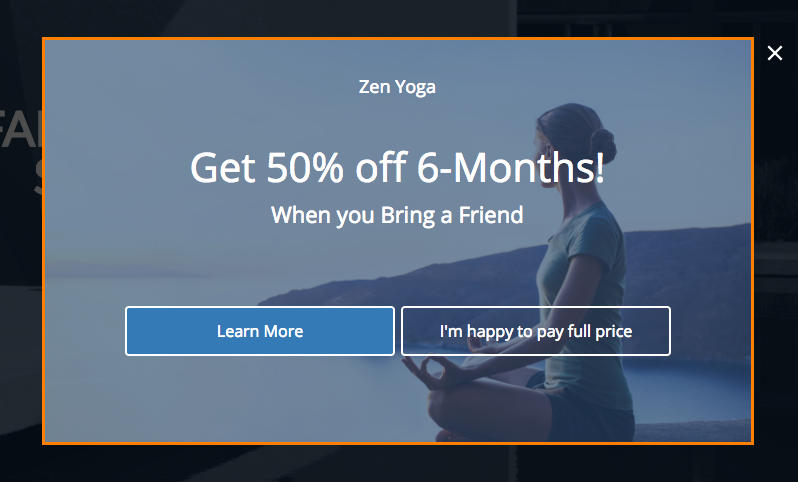
Step 4: Create your Welcome Mat
There are going to be two primary drivers of success with this campaign: inbound traffic and advertising.
Zen Yoga wants to maximize the number of people committing to a six-month subscription for their studios. I’ll show you how to create a simple Facebook Ad campaign in a second, but for now, let’s drive some traffic to the campaign page from Zen Yoga’s homepage or blog (whichever page of your website which has the most traffic).
You want to notify everyone of your newest promotion. So anybody who comes to your website (from any source) sees it front and center.
The best way to do that is with an entry popup or welcome mat.
Simply head into the Wishpond campaign dashboard and click on the “Welcome Mat” campaign icon.
Step 1: Create your Welcome Mat
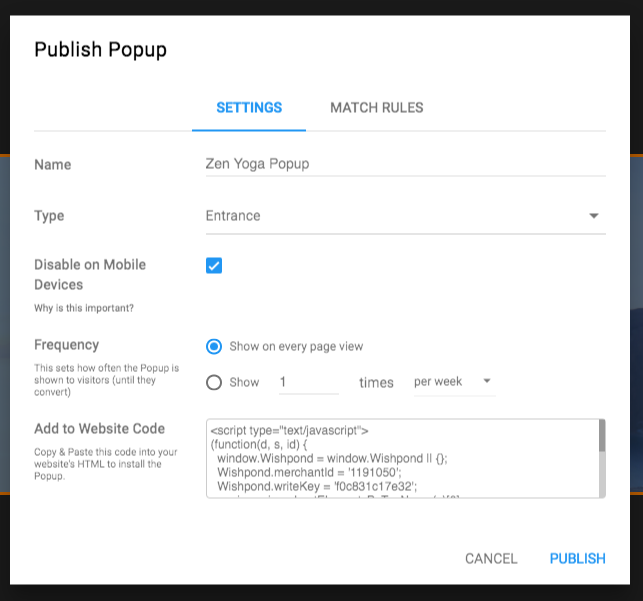
Step 2: Choose when someone sees your Welcome Mat
If you like, you can choose to show your overlay when someone goes to exit the page, after a certain amount of time, after a certain amount of scroll, upon click (like if you want to have a “click here to learn more about our most recent promotion” image or link within your homepage copy) or upon a Javascript trigger (for those of you a bit fancier).
You can also choose how frequently to show your popup. My recommendation is once a day for the duration of the campaign to each visitor. You don’t want to spam them, but you do want to ensure they see it.
Step 3: Choose where your Welcome Mat shows
Select the page you want your welcome mat to show up on (as I said, the page or pages within your website with the most traffic)
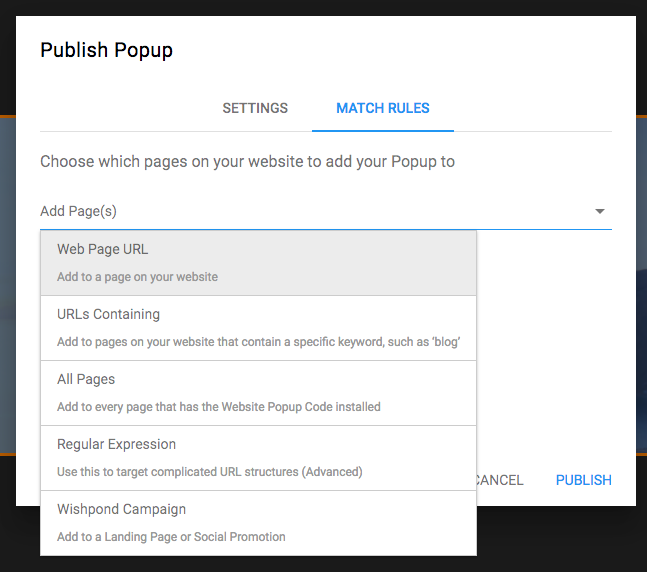
Another Cool Tip…
With Wishpond’s “Match Rules” feature, you could make your popup only show up on certain pages of your blog. For instance, if you had a new Facebook Ads webinar you wanted to promote, promote it only to people who are reading blog articles focused on Facebook Ads.
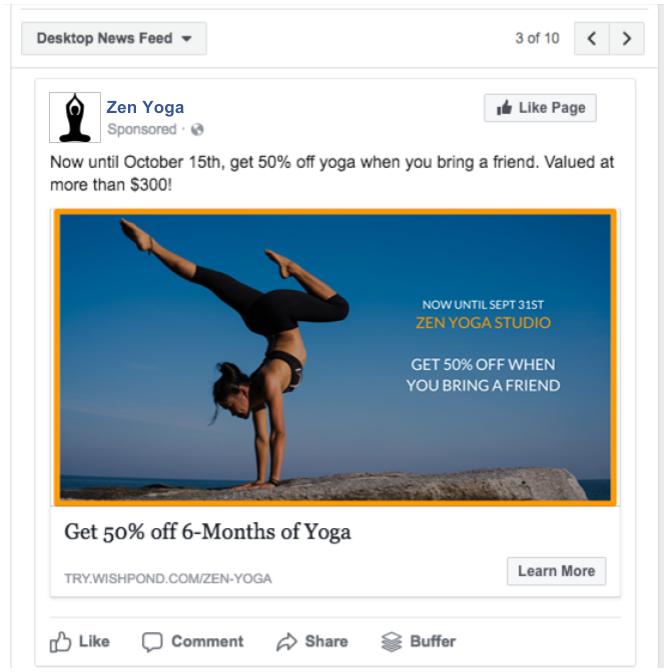
Step 5: Create your Facebook Ad
For most businesses, Facebook advertising offers the most affordable way to drive people to a promotion.
Google Ads work great if your business wants to show up for a high-volume search phrase. While I could create Google Ads for “Yoga Vancouver” and similar phrases, the search volume would be too low for me to drive serious traffic.
Facebook Ads, however, allow me to target people by interest, rather than search – putting the value of my promotion front and center, in front of thousands of prospective people.
Here’s a step-by-step walkthrough for creating your first Facebook Ad:
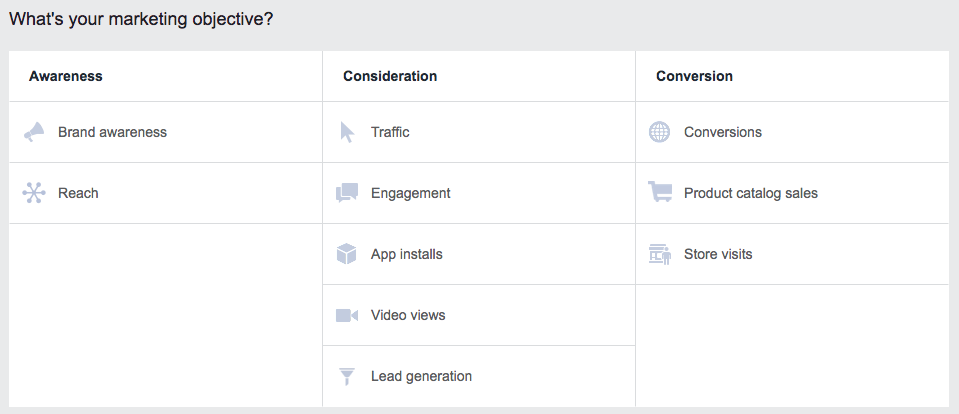
Step 1: Log in to Facebook Business Manager and head to Ad Manager. Then Select “Traffic” as your ad objective:
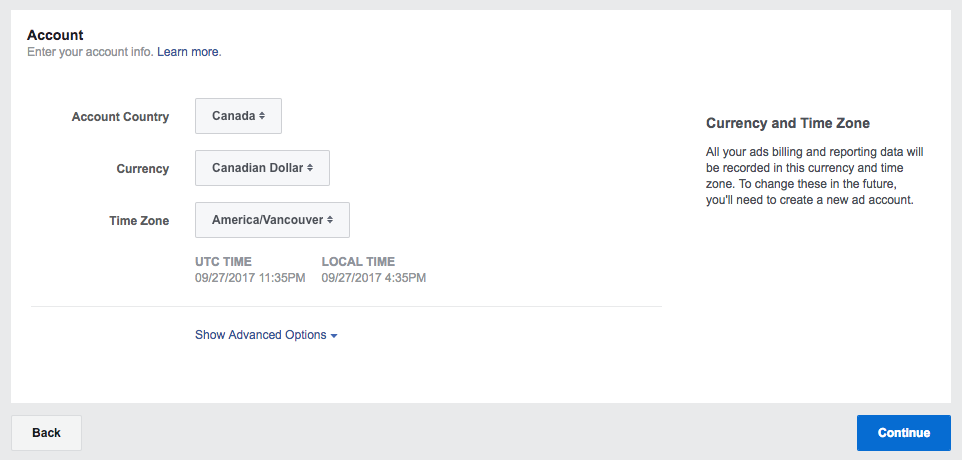
Step 2: Set your currency and timezone:
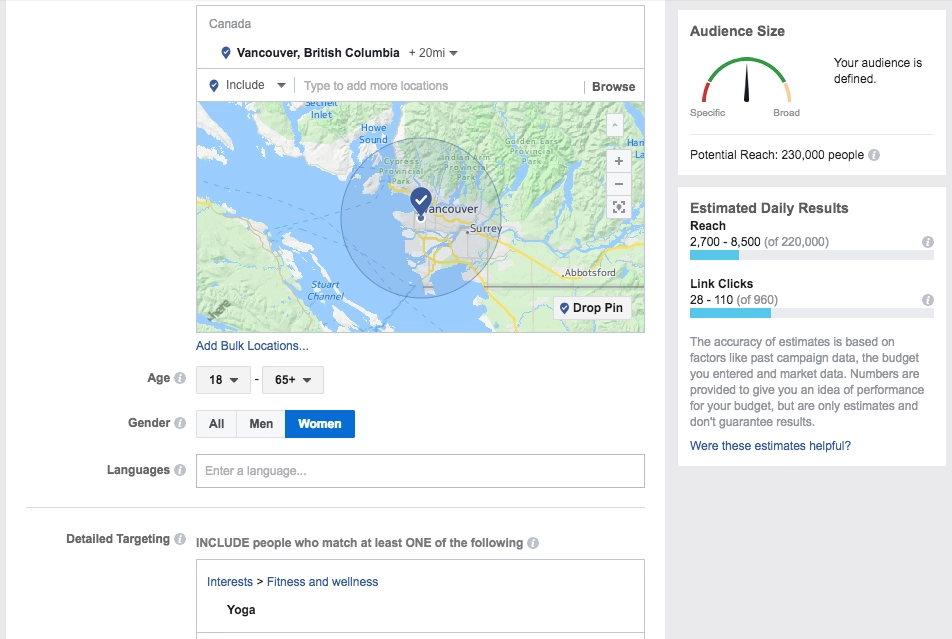
Step 3: Set your ad audience
Step 4: Set your ad budget

Step 5: Create your ad image (just reuse the header from your promotion page)

Step 6: Write your ad copy
Top Facebook Ad Best Practices
- Keep your ad copy (especially your headline) focused on the value of your promotion and the limited-time people have to take advantage of it
- Keep your image simple, and the text within it less than 25% of the image
- Keep your audience size above 150,000 and below 1 million.
- Set your daily ad budget so your estimated average impressions are above 2500/day (remember that you should only be paying when someone clicks on your ad)
- Watch your ad’s Frequency, to ensure that people are only seeing it, at most, a couple times a day.
- One of the most impactful things to A/B test is your target audience and ad design. A good thing to try is to test the gender of your ad model with the gender of your target audience.
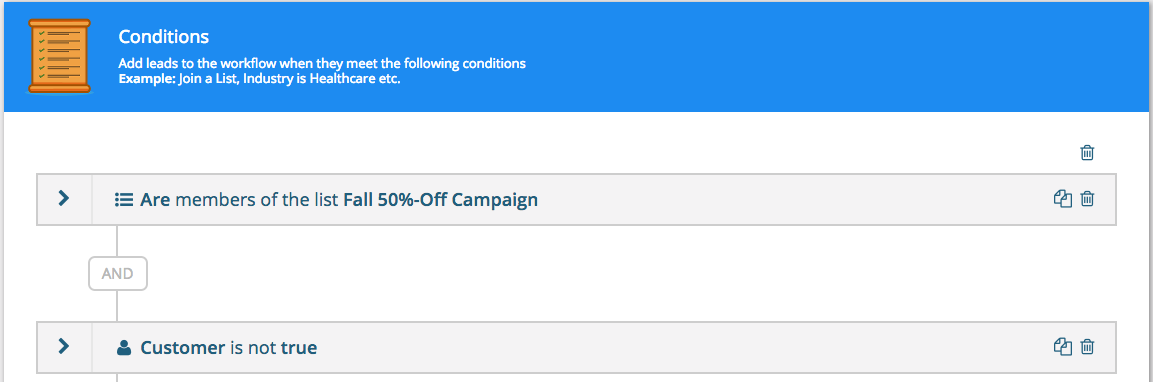
Step 6: Create your Follow-up Email Campaign
This campaign has a pretty serious “real-world” component, inasmuch as Zen Yoga’s store managers would be responsible for noting when someone comes in to take advantage of the promotion.
Managers would head into the Wishpond leads database, find the entrant, and change their lead property from “non-customer” to “customer,” as well as add the information for the entrant’s friend.
If they convert, but don’t end up using the voucher, you still have their email address. This means you have an opportunity to prompt a sale down the line.
For this, I’d create an email drip campaign.
And here’s how I’d do it…
Step 1: Set the conditions for your mailout:
Step 2: Set the actions of your mailout

My recommendation for your drip campaign would be something like this…
- Send an email extending the time-limit on your promotion (only for people who entered)
- Send a follow-up email, educating people about the value of your product/service
- Send another, educational follow-up email
- Send a sales email, prompting entrants to come in for a free session or (depending on your business) jump on a call
Top Tip
Be sure that you’ve segmented your promotion entrants, so that the next time you run a similar promotion you can send them an email specifically relevant to them.
Wrapping it Up
Hopefully this article has given you a better understanding of how to create a complete online marketing campaign – one which actually has a chance of driving real sales for your business.
Everything in this article, except the ads, is possible with Wishpond’s marketing campaign creator, and if you have any questions about how it works, don’t hesitate to reach out in the comment section or on twitter at @JDScherer!
Related Content
- 6 Unique Marketing Campaigns We Love & How to Make Your Own
- 6 Steps to Successfully Launch a Pre-Order Campaign to Build Product Hype
- How to Create a Polished Facebook Marketing Campaign Step-by-Step
- 5 Tips to Keep your Marketing Campaign on Track
- How to Run a Black Friday Marketing Campaign That Drives Serious Sales