

You’re using Google Shopping, right?
If not… well… you’re missing out.
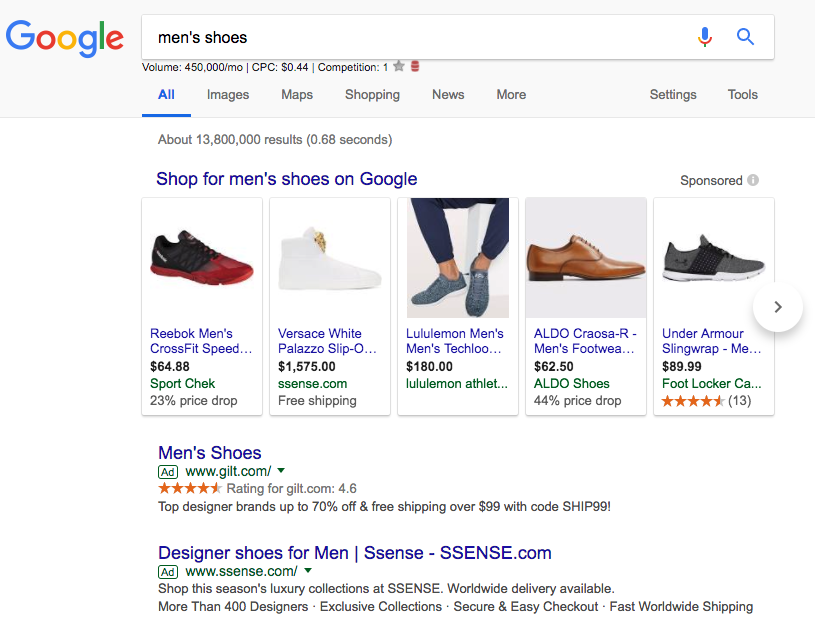
While having your brand show up near the top of text-based search results can certainly help drive traffic to your ecommerce site, it’s much more beneficial for your products to show up in Google Shopping results.
Need proof?
- Google Shopping Product Listing Ads accounted for 52% of search result-based clicks in the first quarter of 2017 (versus text-based and other results, such as images)
- Google Shopping PLAs also accounted for 75% of clicks for non-branded search terms in that same period of time
- Google Shopping PLAs accounted for 16.1% of all online retail sales throughout 2016.
On the one hand, this data makes it clear that gaining a presence on Google Shopping can do wonders for your ecommerce business.
On the other hand, your competitors know this, too.
In other words, you’re going to need to put some work into optimizing your Google Shopping campaigns to make it worth your while.
But, you don’t need to go it alone.
In this article, we’ll dive into some of the most effective ways to optimize your Google Shopping campaigns, and provide step-by-step instructions on how to make it all happen so that you can drive more qualified leads to your website and ultimately sell more products.
Before We Get Started…
We should clarify that, when we say “quick,” we mean “quick to implement.”
As with all other things marketing and sales-related, it’ll take some time to collect, organize, and assess the data we’ll be discussing – and to begin seeing results from the changes you end up making.
That being said, the strategies and tactics we’re going to discuss will prepare even the most novice of Google Shopping merchants to take their next campaign to a whole new level.
Ready to dive in? Let’s go.
Create Pure ID-Level Subdivisions
Typically, you’ll have created ad campaigns that group products based on qualities such as brand or similar features.
By dividing them using what we call the Pure ID-level methodology, you end up creating a subdivision for each and every product you offer.
(Note: While this method can benefit ecommerce companies of any size, it’s more easily implemented within stores with smaller product catalogs.)
By creating product groups for each individual product , you’ll gain a ton of visibility and control over the search results each of your products appear in – allowing you to tweak your ad spend on an individual product level.
Here’s how to do it:
1. When creating a new campaign, subdivide your Ad Group by Brand
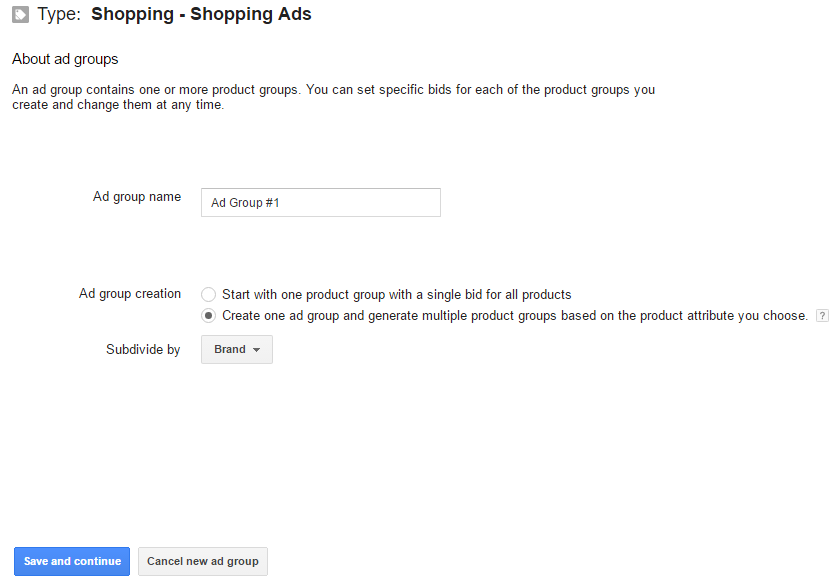
2. Subdivide each individual product within a given brand by Item ID
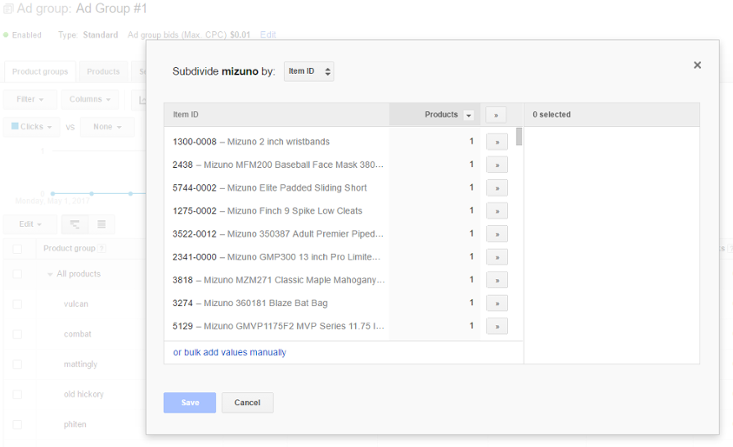
3. Over time, monitor and manage bids and ad spend for each individual product
As we said, this might be difficult for ecommerce stores with thousands of products to implement. But if you do have the capacity to fine-tune your bidding strategy for each of your products, you’ll maximize the potential of every single one of them moving forward.
(Note: utilizing AdWords editor or a third-party tool can make management of an ID-Level structured campaign much easier.)
Filter Adwords by KPIs that Matter
Once you’ve created a pure ID-Level Google Shopping campaign, you’ll be able to have much more faith in the metrics reported for each product.
(In contrast, when multiple products exist within a single subdivision, it can be a bit more difficult to tell which are contributing most to the success or shortcomings of a given campaign.)
That said, you still need to pay attention to the KPIs that are true indicators of the level of success a given campaign has attained.
In our experience, two of the most telling KPIs are a low click-through rate and low (or zero) impressions.
A low click-through rate is typically an indicator of one (or a combination) of three things:
- Poor product title copy
- A poor product photo
- Non-optimized pricing
If you notice a specific product’s ad is performing low in terms of click-through rate, use one of your key search terms for that item and compare these three aspects of your ad to that of your competition.
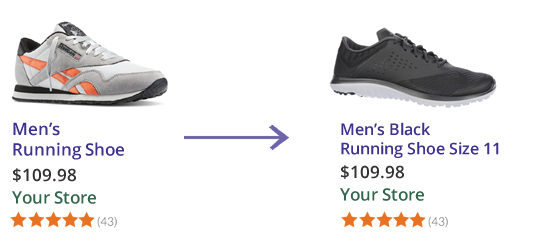
You may need to make a minor tweak to your title copy and product photo… or you might need to revamp your data altogether.
If an product has absolutely no impressions, this obviously means absolutely no one has seen it. Assuming your title copy is at least semi-decent, this means one of two things:
- There’s a glitch within the Merchant Center
- You’ve set your max CPC bid below the necessary threshold
If you believe a Merchant Center glitch is the culprit, simply check the Diagnostics page for additional info and instruction.
If there’s no problem on that end, you’ll, of course, need to increase your bid for the item in question. Typically, you’ll want to increase your bid by about 10-20%, monitor it closely over the next several days, then make further adjustments as necessary.
Modify Bids by Device
As you’re surely aware, consumers use a variety of devices to do their online shopping.
While the device they’re using when your ad pops up at the top of their search results might seem rather inconsequential, you may discover that this factor can make a world of difference.
Once you’ve compiled an appropriate amount of data (typically at least 30-60 days), you want to take a look at how your ads have performed when viewed on various devices.
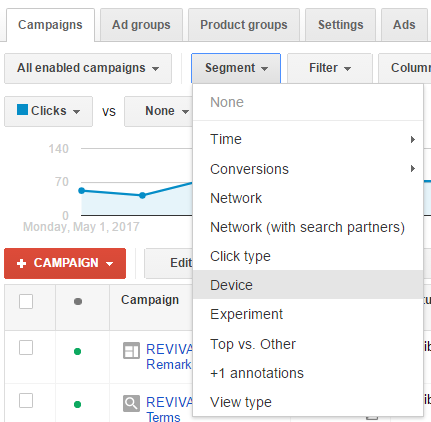
To do so, first go to the Campaigns tab in Adwords and click the Segment dropdown menu, and click Device:
Then check the following KPIs for each device:
- Clicks
- Impressions
- Average CPC
- CTR
- Conversions and Conversion Rate
- ROAS (Conversion Value / Cost)
The most common issue we’ve seen with regard to device-specific metrics is that a lack of mobile optimization causes ad performance to drop significantly on mobile devices. Whatever the case may be, you may discover a need to balance your cross-device ad spend accordingly.
Did you know?
Wishpond’s landing page builder was built to create pages which are automatically mobile optimized. Our column and row structure stacks your content vertically while retaining center alignment. Learn more at Wishpond.com.
Prioritize Top-Performing Products
Now, optimizing your overall Google Shopping initiative isn’t just about tweaking your poor performers in order to “catch up” to your best ones.
It’s also about ensuring that your top-performing products bring in the most business they possibly can.
That said, it’s essential that you determine which are performing best, then adjust the campaigns running these ads accordingly.
Here’s how to do it:
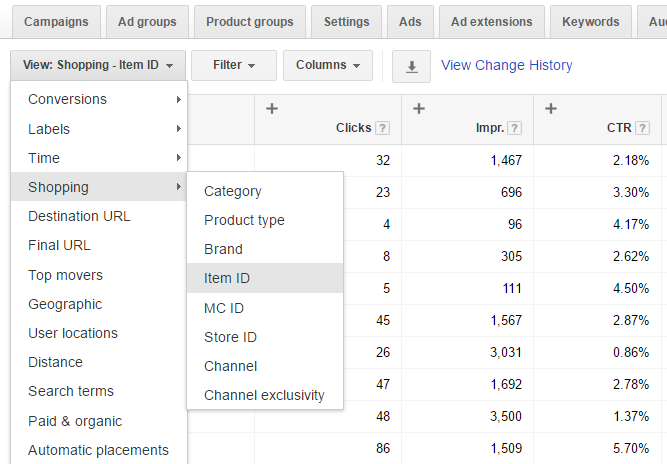
- In Adwords, under the Campaigns tab, click Dimensions
- Click the View dropdown menu, select Shopping, then select Item ID
- Filter and sort these results by conversions or conversion value
- Export the top revenue or conversion-driving ads to an Excel or Google Sheet
- Create a new Google Shopping Campaign, setting priority level to High
- Set all other campaigns’ priority level to Medium
- Start a single ad group for all products
- Open the subdivision menu, and select “add bulk values manually”
- Go back to your exported spreadsheet, copy all of the Item IDs, and paste them in the field on the campaign setup page
Important Note: Be sure to also exclude “Everything else in All products,” so that no other products end up being grouped within this campaign.
Once you have this new campaign set up, you can increase the maximum daily ad spend for your top-performers – leading to even more exposure for the products that have provided you with the most value.
Use Geographic and Time-Based Ad Targeting
Where and when your ads are presented have a huge impact on how successful they are, in a few different ways.
Let’s start by discussing location.
Needless to say, your products will almost certainly resonate more for customers living in one area than those living in another. You’re probably not going to be able to sell many surfboards in Minnesota, right?
With that said, we’re heading back to the Dimensions section under the Adwords Campaigns tab. Under the View dropdown menu, click Geographic.

From there, you can assess the performance of your ad in various areas of the country (or world, for that matter). By sorting and/or filtering this data, you’ll be able to see which geographic area is generating the most – and least – amount of related searches, click-throughs, and conversions for a given ad.
A good way to optimize for location is to target both your most and least successful areas.
We typically suggest looking at data on the state level if you’re targeting the entire country, but you can certainly get as granular as you feel you need to get.
Once you’ve added these locations in your settings, set bid adjustments higher for successful locations as to push more of your ad spend into places you perform well, and set negative bid adjustments in the areas you perform the worst.
Doing this will help cut wasted ad spend, and when done right can increase your overall ROAS.
The time of day your ad appears in your target consumers’ search results also plays a major role in whether or not they engage further with your brand.
To check out this data, you’ll again go back to Dimensions. This time, after clicking the View dropdrown menu, you’ll want to check out both “Hour of day” and “Day of the week.”
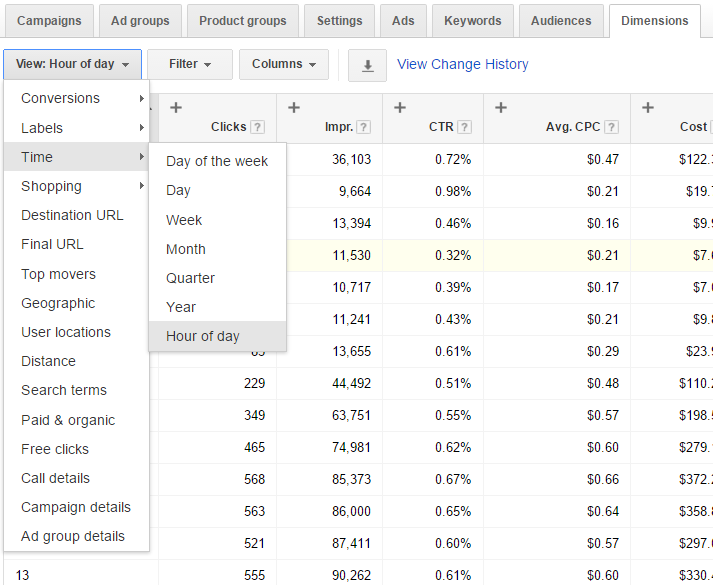
As you’ve probably guessed, this will show the engagement metrics on certain days, and at certain times of an average day, for your ads.
A similar principle can be applied to day/time targeting as with location targeting.
For example, let’s say your products sell more during the week as opposed to the weekend. You’d target all 7 days of the week, set negative bid modifiers on the weekends and increase your bids during the week.
This is just another way that you can gain control over how and when your daily budget is spent.
Optimizing with Negative Keywords
Although using the right keywords in your product titles is essential for getting your ads in front of the right eyes, there are times in which using certain words can actually get your ads in front of the wrong eyes.
Unfortunately, nothing good comes of this. For one thing, your ad might unintentionally come off as “spammy” if seen by an individual whose search term had nothing to do with your product. Secondly, if one of these “irrelevant searchers” accidentally clicks on your ad, they’ve used up one of the clicks you’ve paid for. Lastly, if they don’t engage with your ad (since they have no reason to do so), it’ll reflect negatively on your store in the eyes of Google’s algorithms.
One of the most efficient ways of identifying negative keywords is to assess the click-through rate and other metrics of various terms within your Adwords Search Query Report.
When analyzing this list, you might discover your ad is being presented to those who search for a term that’s seemingly related to your product – but is far from accurate. As a rather simple example, if you sell basketball sneakers, you wouldn’t want your product to show up for people searching for the general term “shoes.”
Note: A lot more goes into discovering and dealing with negative keywords than we have room for here. Check out this post on our blog that goes much deeper.
Remarket Using RLSA
One of the most common sense, yet most commonly overlooked, campaign optimizations for Google Shopping is RLSA, or audience-based remarketing.
What makes this such a powerful tool is the fact that, not only is cost effective, it’s also incredibly easy to set up and manage.
It’s not a separate campaign like dynamic remarketing where you need to go in and update bids, adjust placements, etc., and regularly manage it.
Simply build the audiences in Google Analytics, add them as targeting in your Google Shopping campaign settings, set the bid modifier, and let it make money for you.
Adding RLSA has been shown to reduce the average cost-per-acquisition by 53%, and has led to average of 10% increased conversions.
This is because you’re focusing ad spend on shoppers that have already shown interest in your site and/or your products.
The idea is to increase bids on these groups of people, since the likelihood of them converting is higher than a brand-new visitor.
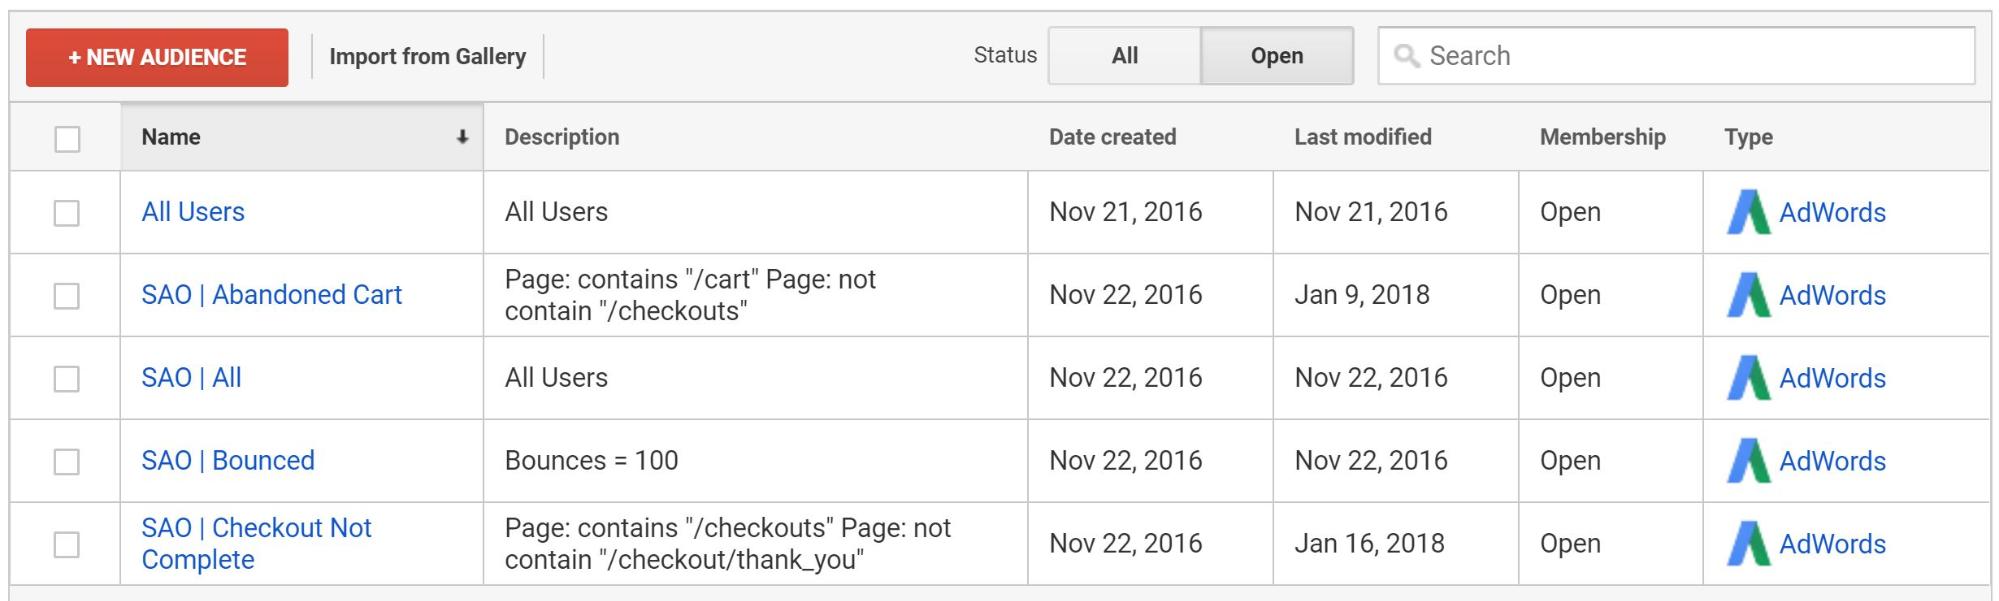
To get started, it’s recommended that you focus on 4 main groups of people:
- All Visitors – anyone who clicked your Google Shopping ad and came to your site
- Abandon Cart – shoppers who put an item in their shopping cart, and never went through with the checkout process
- Abandon Checkout – shoppers who began the process of checking out, but never fully completed the purchase
- Bounced Visitors – people who came to your website and immediately left without performing any actions.
For the first 3 audiences, the idea would be to set a bid modifier that increases your CPC bids so that your product shows up first, or close to it, the next time they search in Google Shopping.
For the 4th audience, bounced visitors, you’d ideally set a negative bid modifier so that you decrease the likelihood of showing up in their search again, since they’ve shown a disinterest in your store. This is a money saver, since you’re cutting out non-converting traffic.
Pro Tip: When adding audiences to your Google Shopping campaign, be aware of the targeting settings, of which there are 2, Target & Bid and Bid Only. The most ideal application for RLSA is Bid Only, as this will only adjust your max CPC bids based on your modifiers. If you set to Target & Bid you will set the campaign to only target these audiences of people and will greatly reduce your overall web traffic and visibility in Google Shopping.
Implement QuickShop-Style Landing Pages
In 2016, SearchEngineLand analyzed over 15,000 Google Shopping conversions, and found something rather odd:
Nearly two out of every three products purchased were not the product featured in the ad that brought the customer to the page. In other words, 66% of customers clicked on an ad for one product, but ended up purchasing another.
Now, as you surely know, Google Shopping requires that the web page an ad links to follows certain guidelines. One of the most important of these guidelines is that the product from the ad must be the most prominently-displayed product on the following page. Basically, this means you can’t use an ad for an individual product to attract people to your homepage or a product category page.
But, as we just noted, consumers have a tendency to not end up purchasing the initial product in question. With the above guidelines in place, this may also mean your visitors end up buying nothing at all.
Unless you find a workaround.
For a prime example of what we mean, take a look at this example from Wayfair…
Clicking on the second ad from the left here…
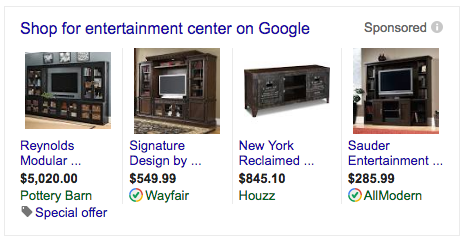
Brings you to this page:
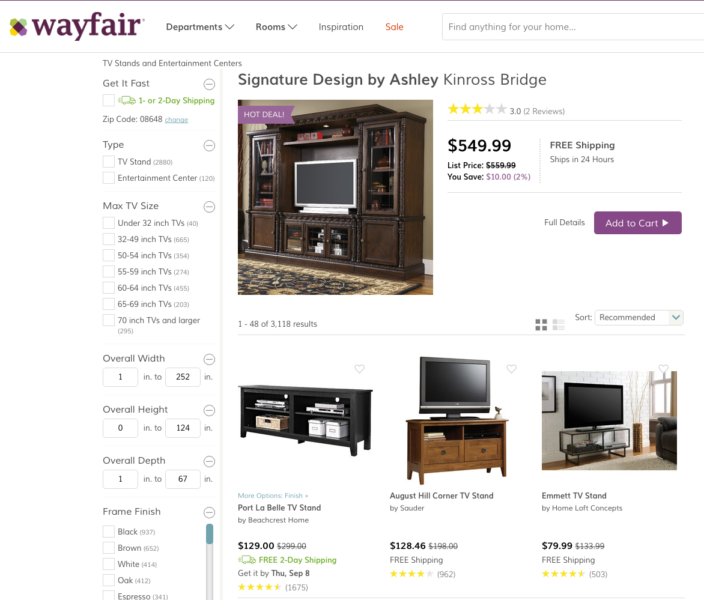
While the product in question is certainly the most prominent on the page, the visitor is also presented with a number of other related products, as well. Additionally, they can easily use the filtering options on the left-hand side of the screen to begin a more full-blown search for the product that best fits their needs.
While this tactic has more to do with your on-site product pages than with your Google Shopping campaigns, it’s certainly worth considering that an ad for a specific product might actually lead to the purchase of entirely different – or multiple other – items.
Wrapping Up
Overwhelmed yet?
Don’t worry. As we said, using these strategies and tactics – and seeing results from doing so – isn’t something that will happen overnight.
On the same token, there’s no need to implement all of these strategies all at once, either. Your best bet is to take things slowly, making sure you have a decent understanding of how each of these strategies can help improve your overall operations before diving into the next tactic.
Eventually, though, implementing each of these tactics will become second nature – and you’ll be ready to dig into even more advanced ways of optimizing your next Google Shopping campaign before you know it.
Sales & Orders’ Certified Shopping Specialists can also provide more hands-on assistance with a free review of your Google Shopping campaigns. Contact us for a free review of your campaign.
About the Author:
Rich Aviles is a content marketer with Sales & Orders, which provides management software for Google Shopping. He’s also an avid camper, lover of dogs and a fan of everything Yankees/Rangers/Giants/Knicks. Find him on Twitter @richaviles_.